
This article may contain affiliate/compensated links. For full information, please see our disclaimer here.
Adobe Lightroom is one of the most powerful editing software packages available for image creation today, which is one of the reasons why it is the first port of call for many photographers when editing or retouching their images. It offers a huge range of tools at your disposal and for many people it is the only thing you will need to edit your images.
As well as its extraordinary capabilities, it can be a fairly easy software for beginner photographers to get to grips with. Its easy to use interface is very straightforward meaning it is the perfect place for beginner photographers to learn their craft.
Even if you have no desire to learn how to edit your photos, you can still create some extraordinary looking images with the use of Lightroom presets. A Lightroom preset is a feature used in Lightroom where you can load everything you have done in a previous edit using just one click and apply it to any image you’d like. So, if you really like how you have edited one of your images, you can save the edit for future uses.
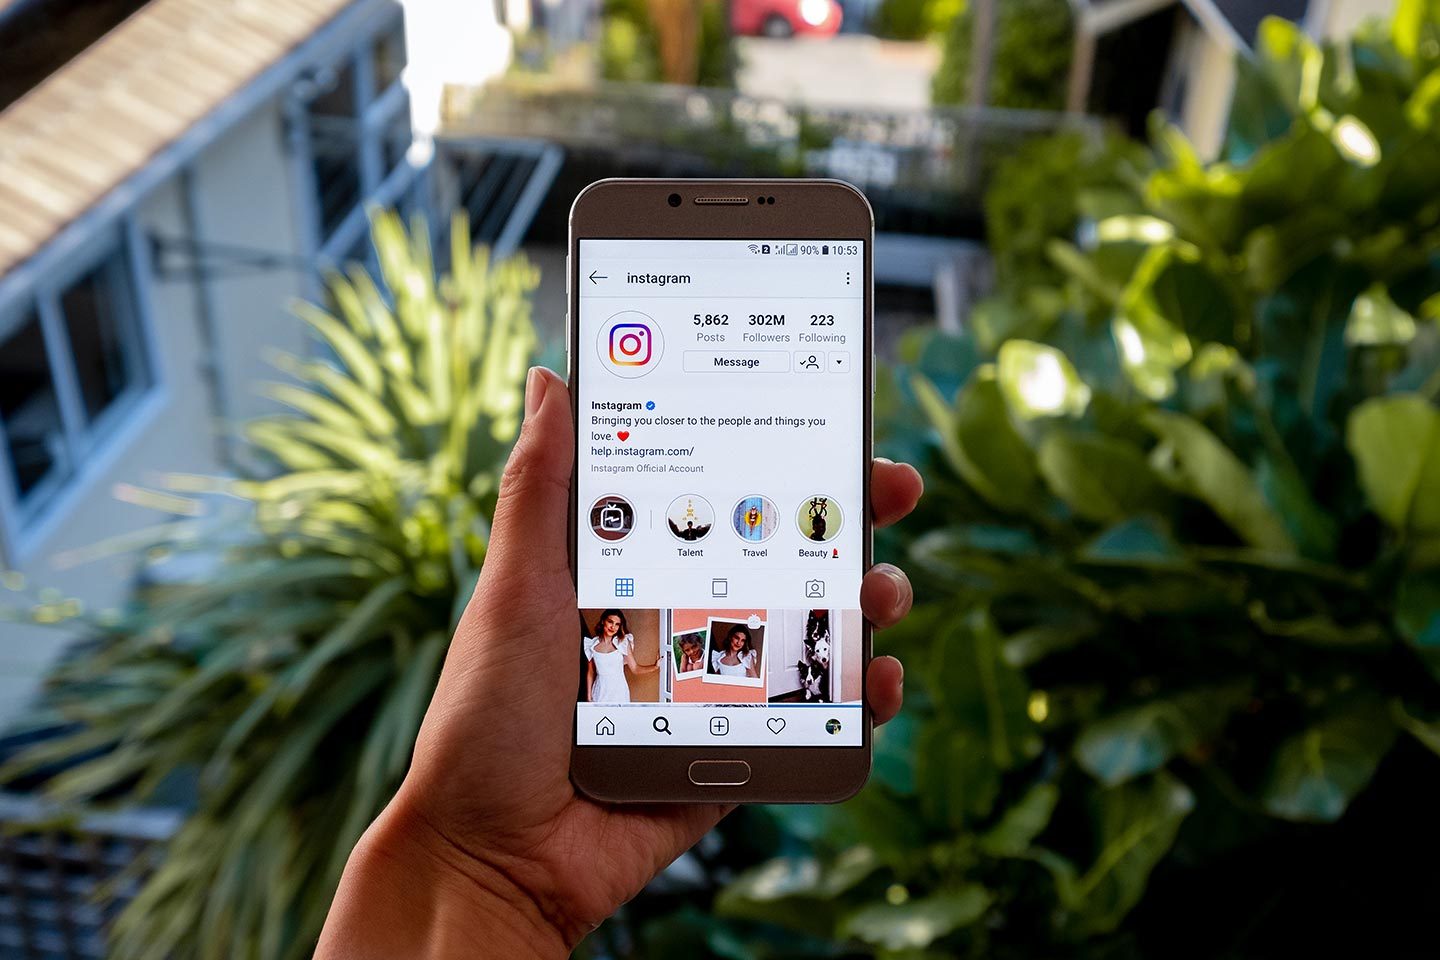
Nowadays it is very common for professional photographers and many Instagram influencers to offer their Lightroom presets as downloads so that you can create images that look as great as theirs. Many of these you can purchase online but you can also find some as free downloads.
Installing these presets is extremely easy but depending on what version of Lightroom you are using the process is slightly different. Below you can find the complete walkthrough of how to install Lightroom presets on the different versions of their software.
How To Install Lightroom Presets On Lightroom CC 2018 and Lightroom Classic CC
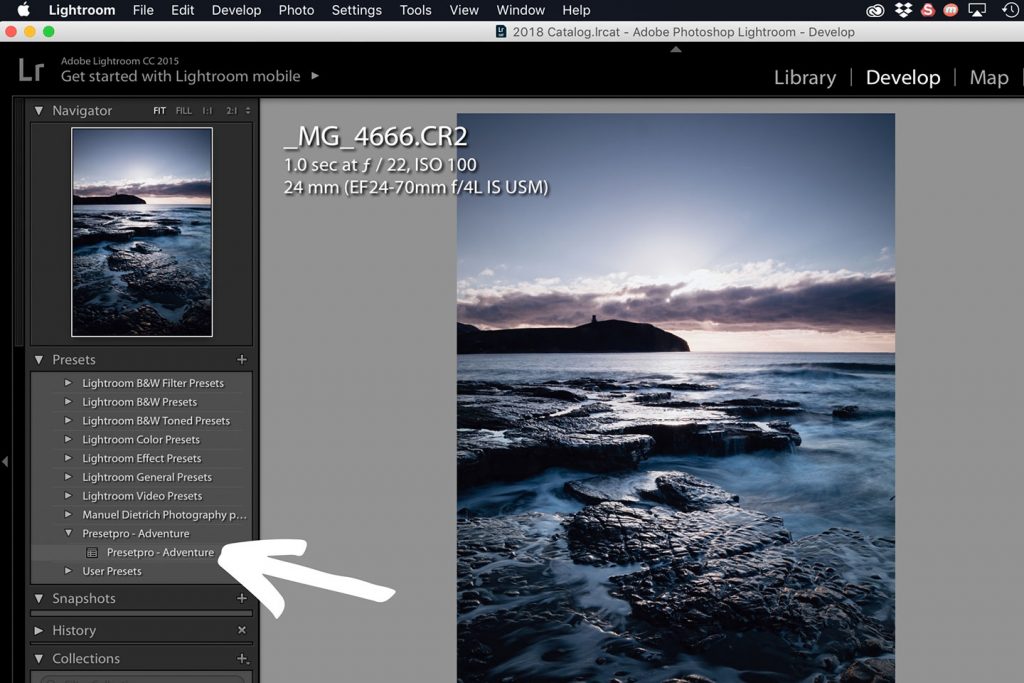
Once you have found some presets you would like to install on Lightroom, download them to your computer. For the purpose of this I have downloaded some free presets from freeLightroompresets.co. Locate where the folder downloaded to, you should find a zipped folder that you need to extract. To extract the folder on a mac simply double click the folder, if you are using a PC right click on the folder and select Extract All. Now you have the presets follow these steps to properly install into Lightroom
1. Open Lightroom CC
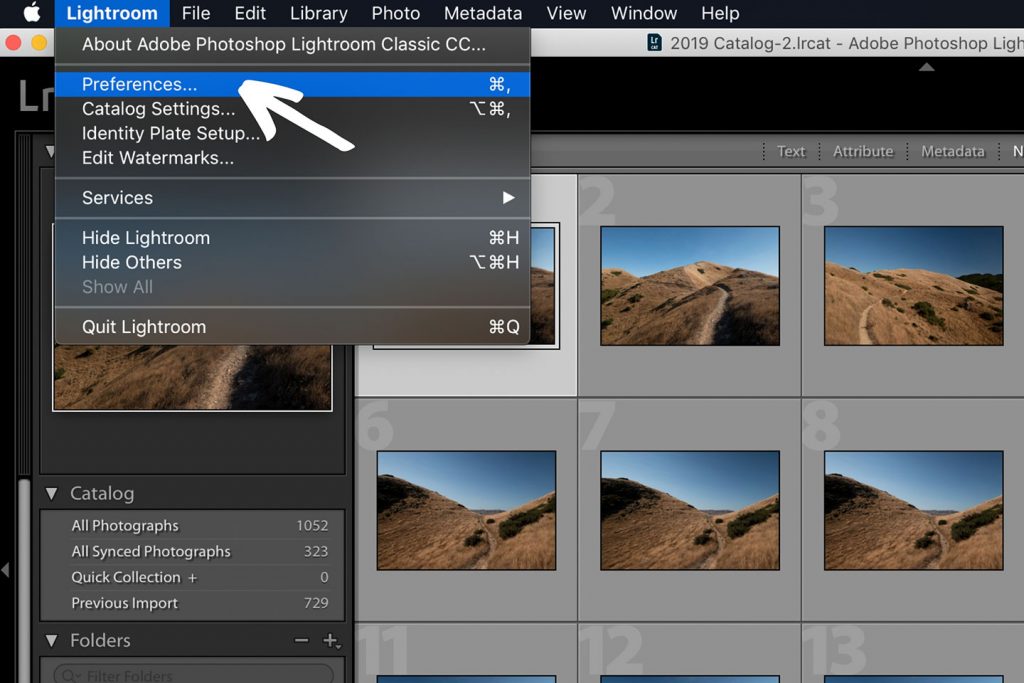
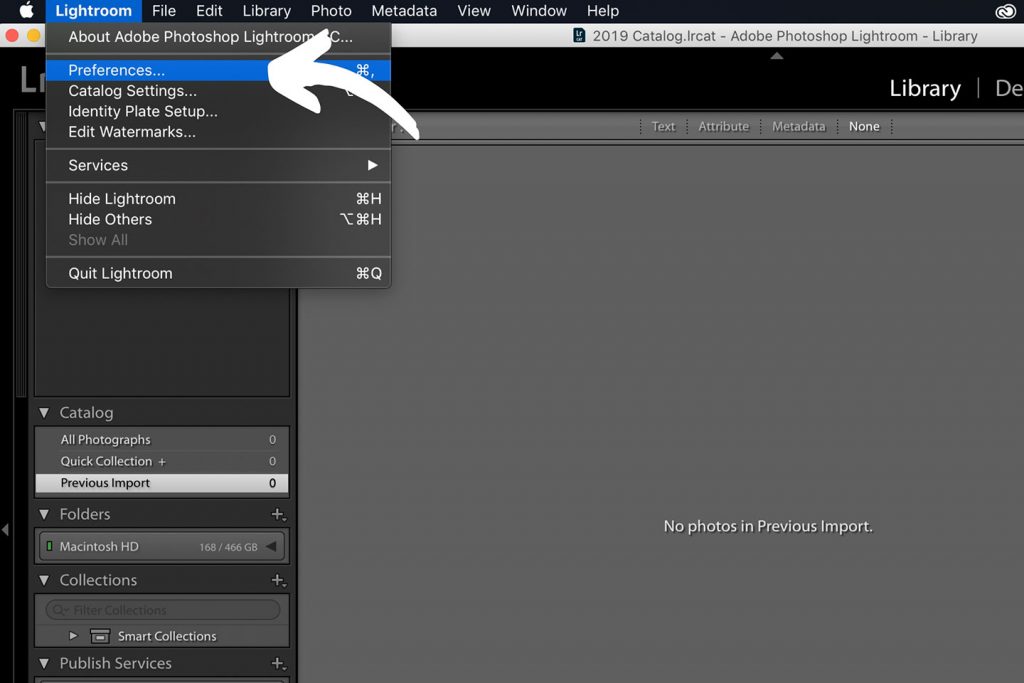
2. On a mac click the Lightroom tab at the top, next to the Apple logo and then click on Preferences. If you are using a PC, click on Edit in the top menu next to File, then click on Preferences.
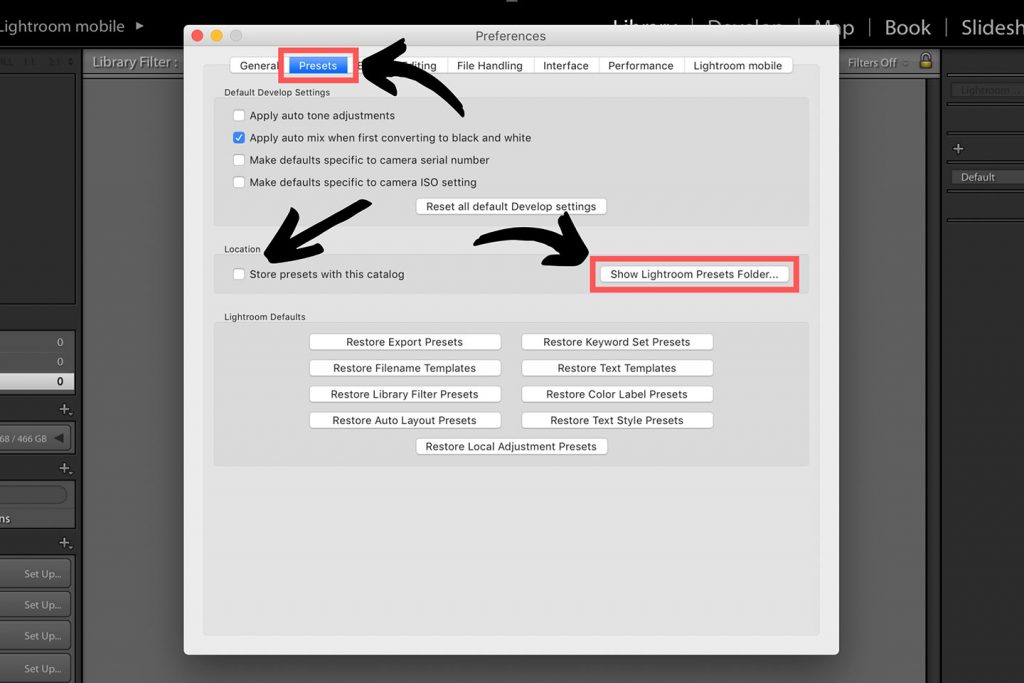
3. A new screen will pop up, on this new screen click onto the presets menu at the top.
4. You want to make sure that under Location, Store Presets With This Catalog is unchecked.
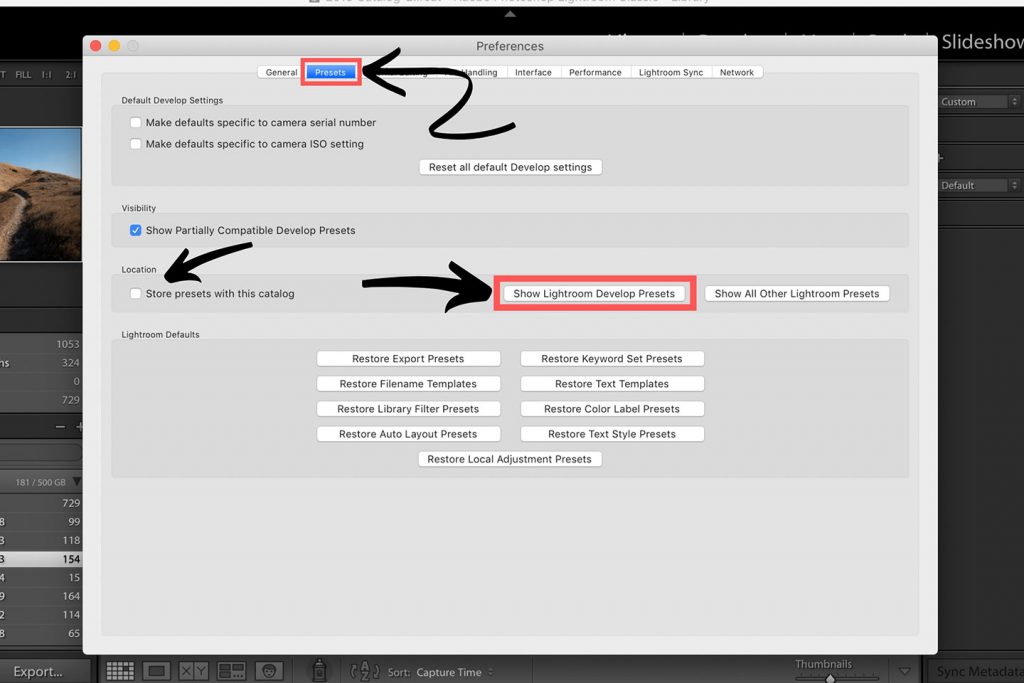
5. Then you want to click, Show Lightroom Develop Presets. This will take you to the folder you need to copy the presets to.
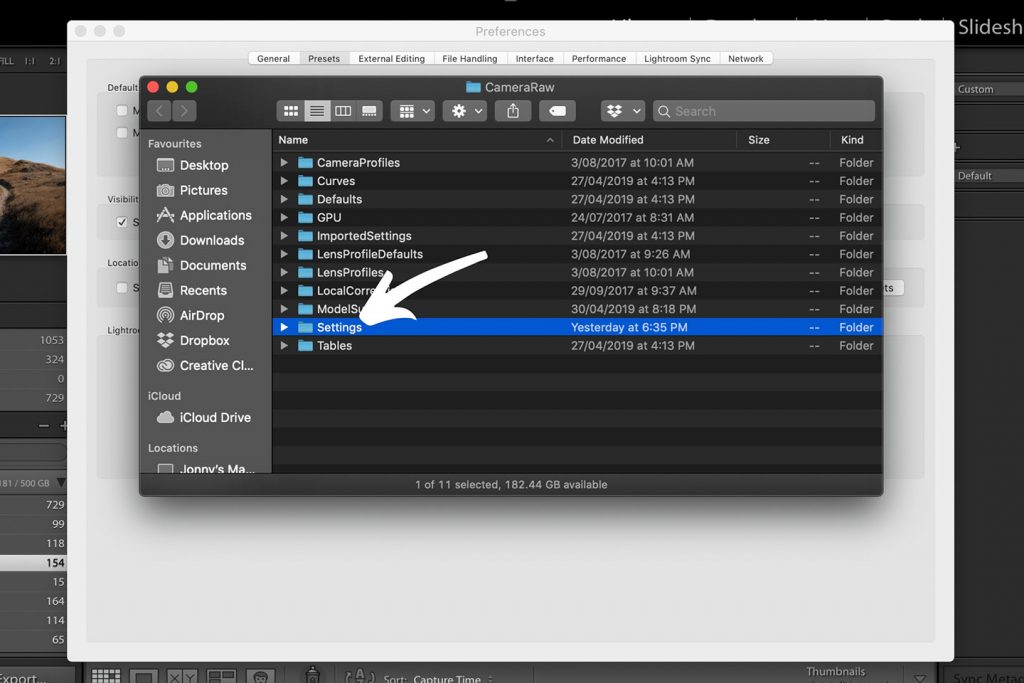
6. Double click on settings and paste the folder that you extracted earlier. It should have the .xmp files in it.
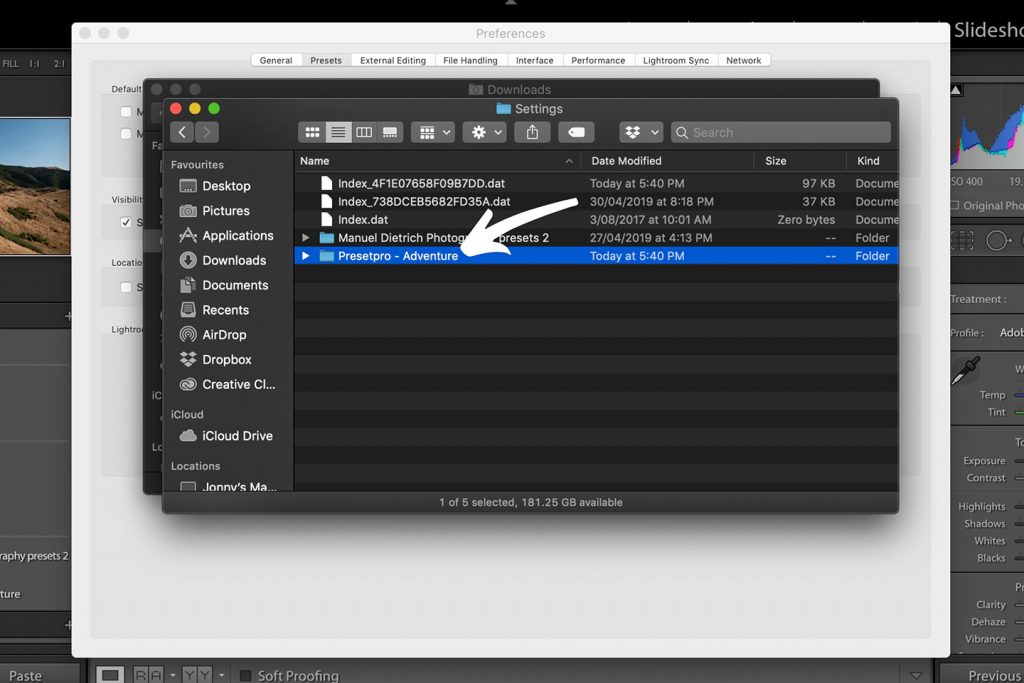
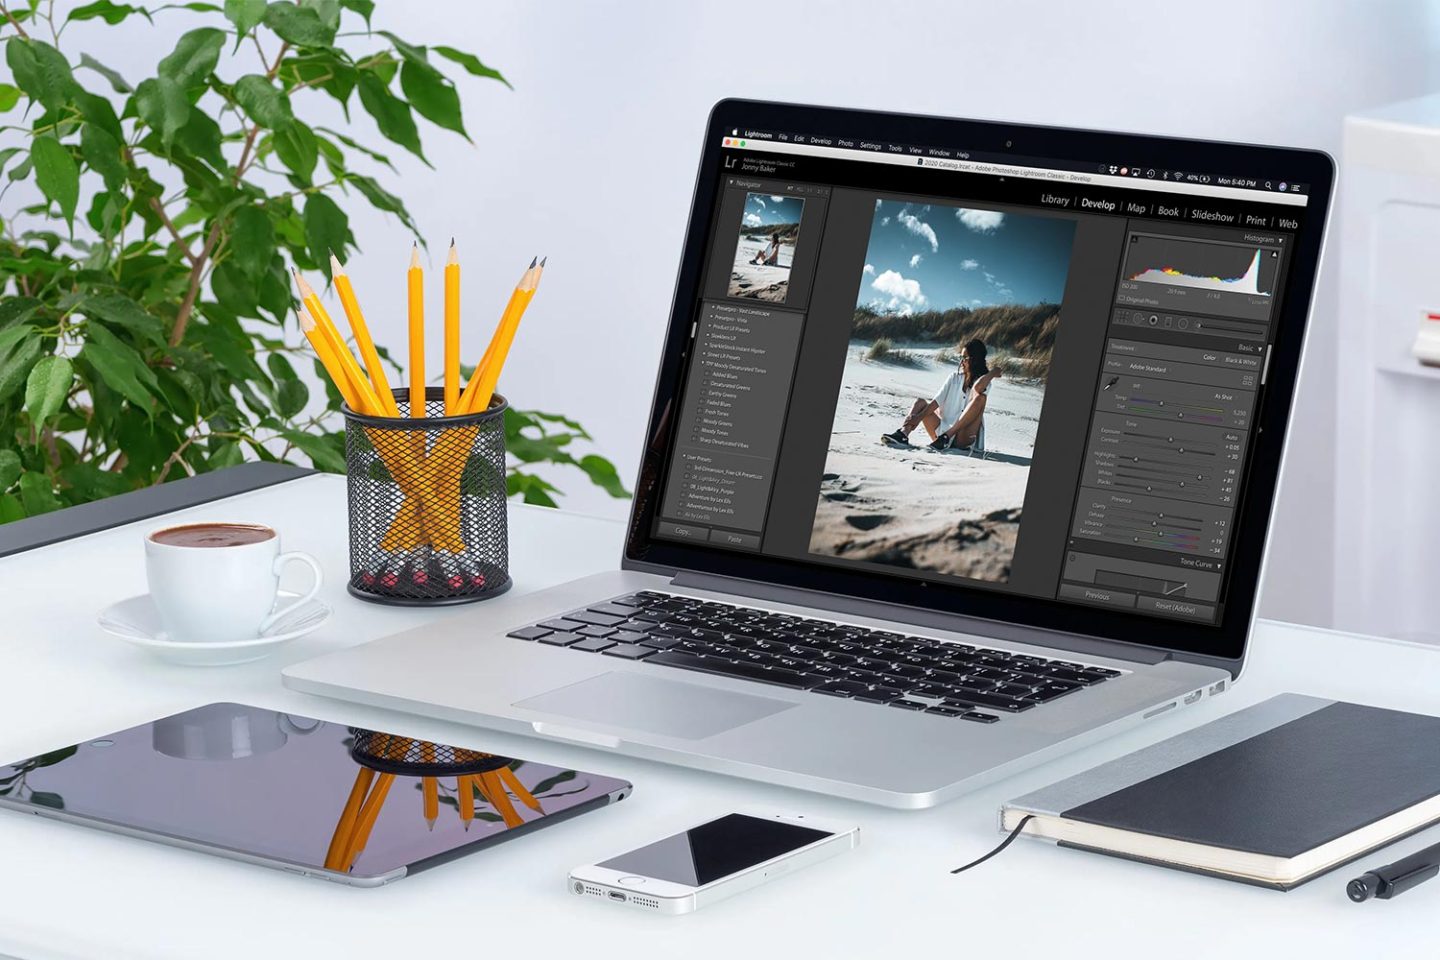
7. Restart Lightroom and the presets should be on the left panel when you are in the develop menu.

How To Install Lightroom Presets On Older Versions
If you are using Lightroom CC 2017 or Lightroom 4, 5 or 6 the method is similar with a few differences as the files are slightly different. Instead of .xmp files the presets are .lrtemplate files, all this really means is that you have to put the files in a different location.
Download your preset files, once the download has finished find the zipped folder that you have downloaded and extract it. To do this on a mac simply double click on the folder, on a PC right click on the folder and click Extract All. Now follow these steps to install in Lightroom properly.
1. Open your version of Lightroom
2. On a mac click the Lightroom tab at the top, next to the Apple logo and then click on Preferences. If you are using a PC, click on Edit in the top menu next to File, then click on Preferences.
3. A new screen will pop up, on this new screen click onto the presets menu at the top.
4. You want to make sure that under Location, Store Presets With This Catalog is unchecked.
5. Then you want to click, Show Lightroom Presets Folder. This will take you to the folder you need to copy the presets to.
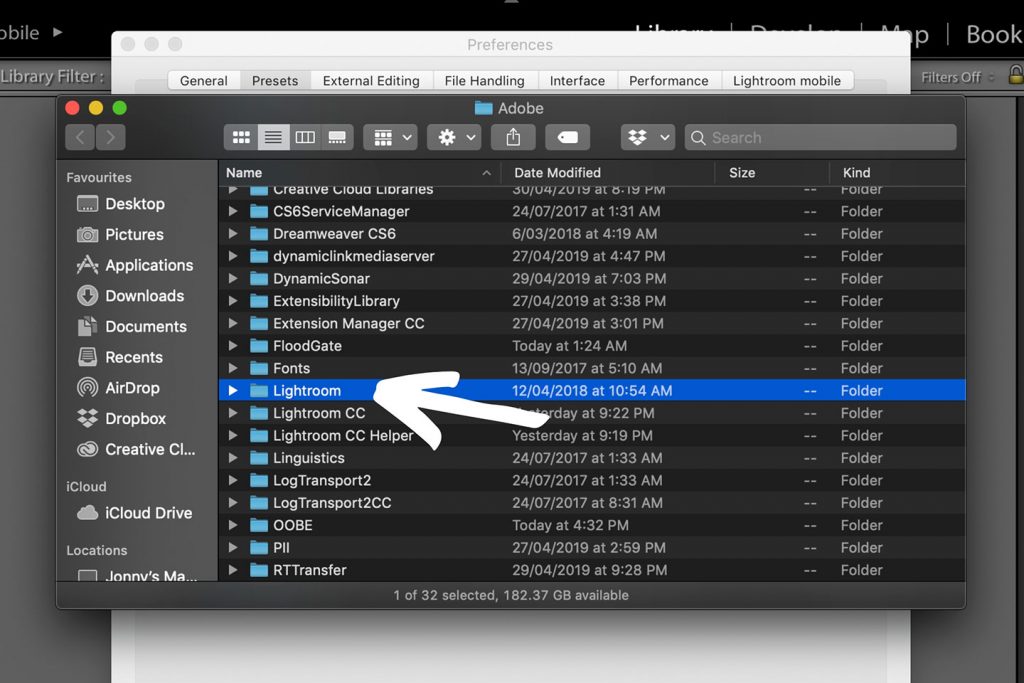
6. Click onto the Lightroom folder and then click on the Develop Presets folder.
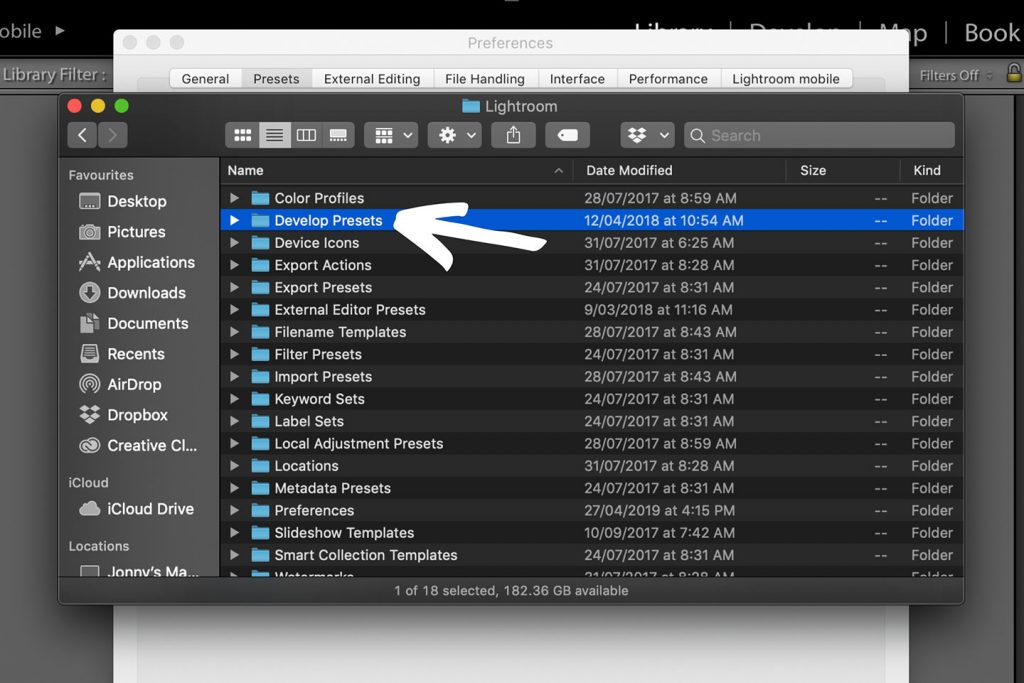
7. Copy and paste the folder that you extracted earlier. It should have the .lrtemplate files in it.

8. Restart Lightroom and the presets should be on the left panel when you are in the develop menu.
How To Install Lightoom Mobile Presets
If you are looking to create some magic on your mobile device you can also install presets onto the Lightroom CC mobile app. Follow these steps in order to do just that.
1. Download your mobile presets straight to your phone or tablet.
2. If the file you download is a zipped folder you will have to extract the folder. On an android this should be easy just select the folder and click unzip. If you are using an iPhone or iPad you will likely need to download an app to unzip the files. Alternatively, if you are having problems, you could unzip the files on a computer and send the unzipped folder to your device using dropbox or via email.
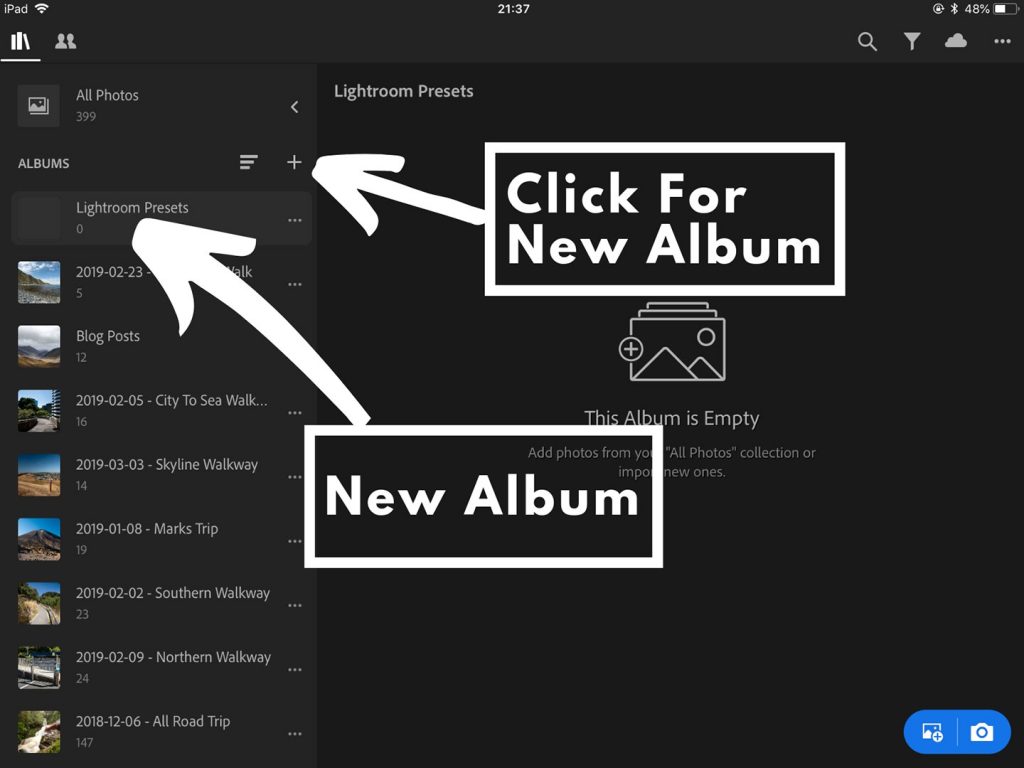
3. Next you need to import the DNG files into the Lightroom app. To do this create a new album, name the album and then open the album.
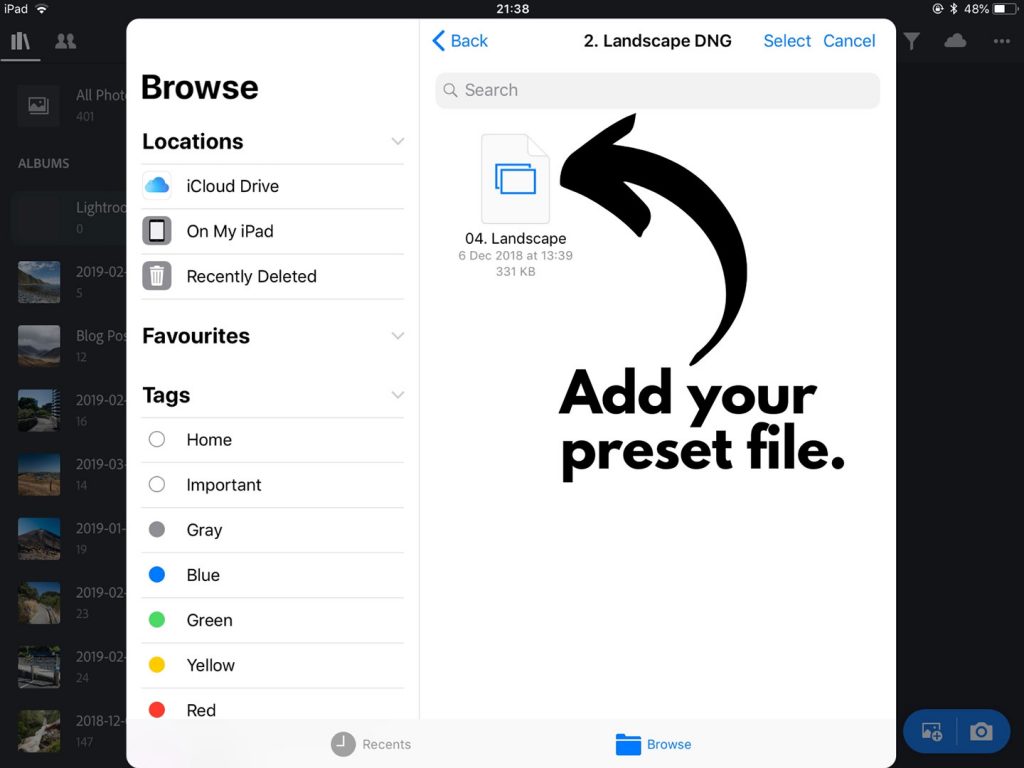
4. Go to Add Photos and select the DNG files from the location that you saved them to when you extracted them. Select all the files you want to import and click Add Photos.

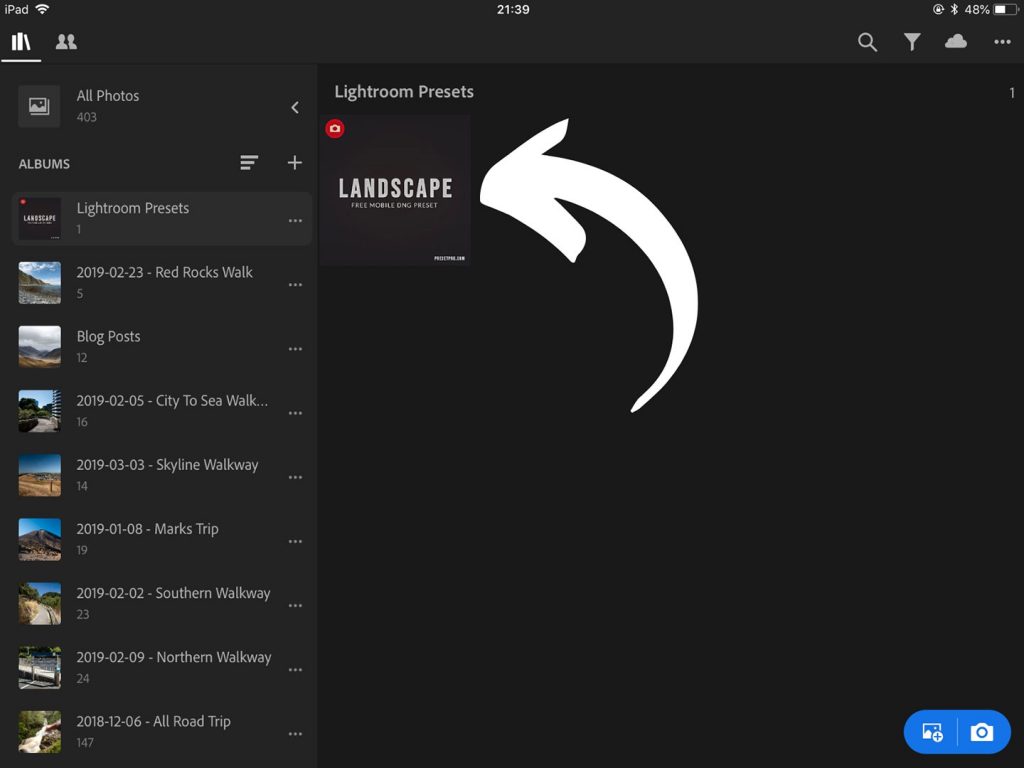
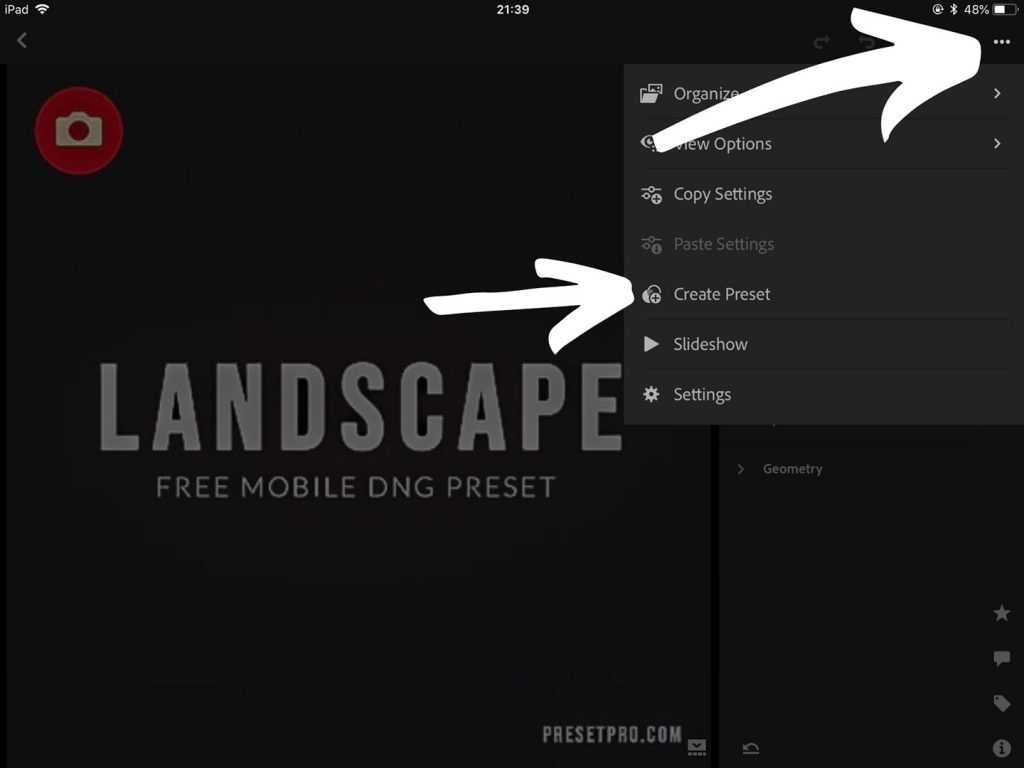
5. You should have the files in your new album. Open one of your files by clicking on it, then tap on the three dots icon in the top right of the screen, and select Create Preset.
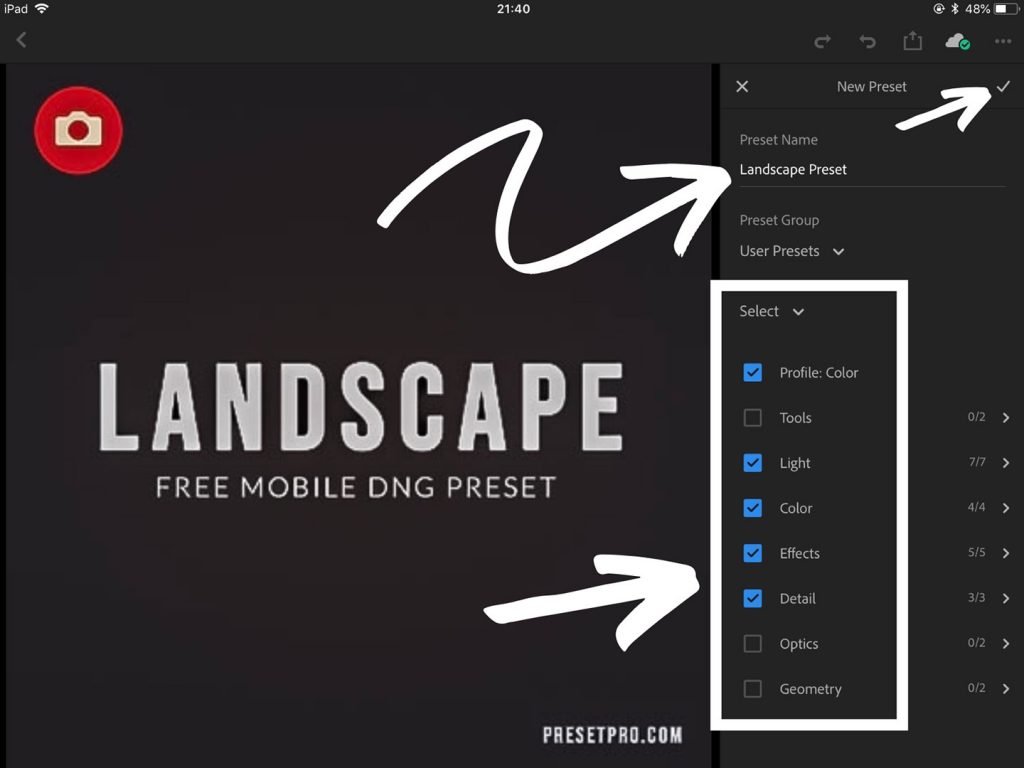
6. Give the preset a name, select the preset group you would like to save the preset under, you can create a new one if needed. Then select the checkboxes below for what changes you would like applied in the preset. I would select all except Tools, Optics and Geometry as this will likely change for each photo you are editing. When finished select the tick in the top right corner to save the preset.
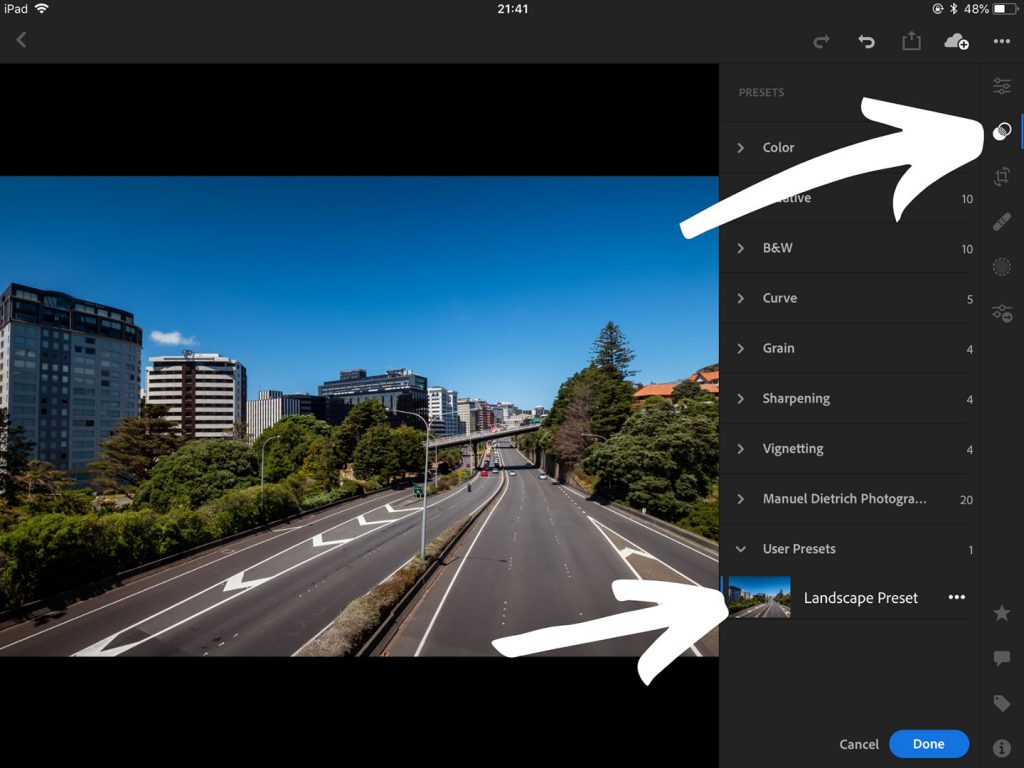
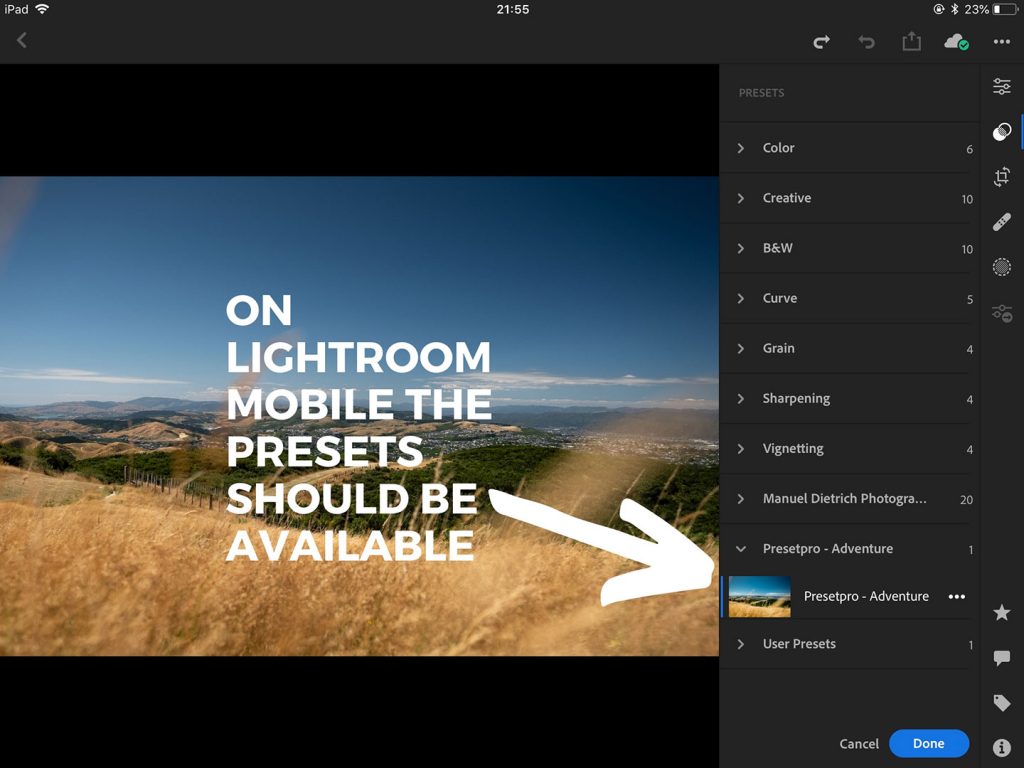
7. Your preset is now ready to use on any photo you want to edit. To use the preset, open a photo and select the preset menu on the sidebar or bottom of the screen. It is the icon with the two circles intersecting. Select the preset group you saved the preset to and simply click the preset to apply it to your image.
How To Sync From Lightroom CC Classic To Lightroom CC Mobile
If you would like to sync your presets straight from your Lightroom Classic desktop app to Lightroom Mobile you can do this very easily using another application on your computer which is simply called Lightroom CC. This acts as a bridge between your Lightroom Classic and Lightroom Mobile app. The process of syncing is fairly simple, follow the steps below to have your desktop presets on your mobile device in no time.
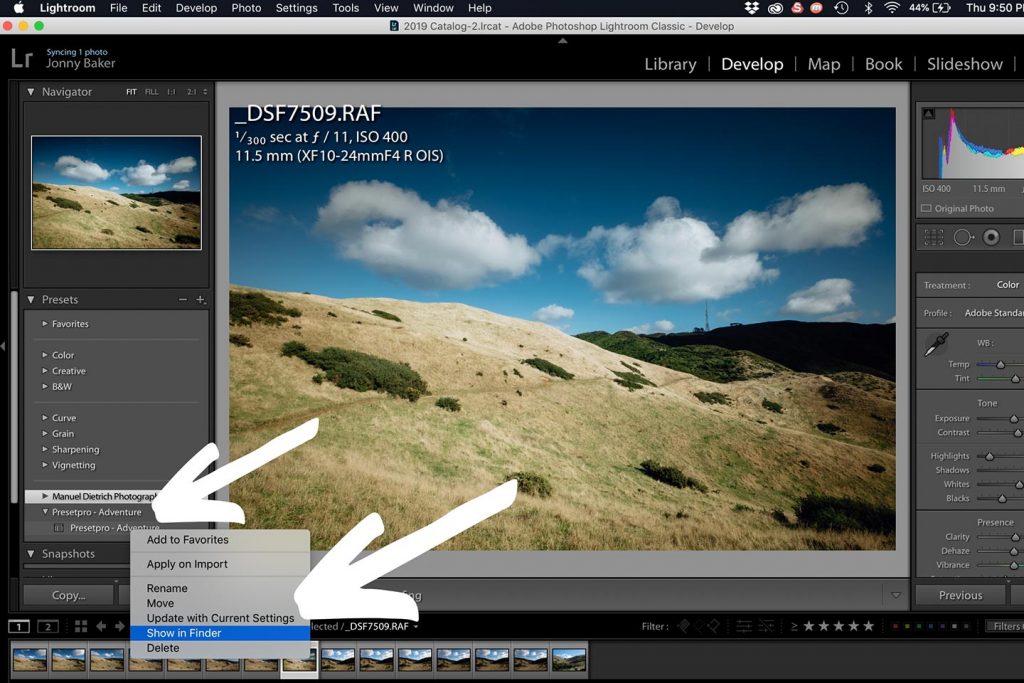
1. Open Lightroom Classic CC on your computer and find the presets on the left sidebar that you would like on your mobile app, under presets.
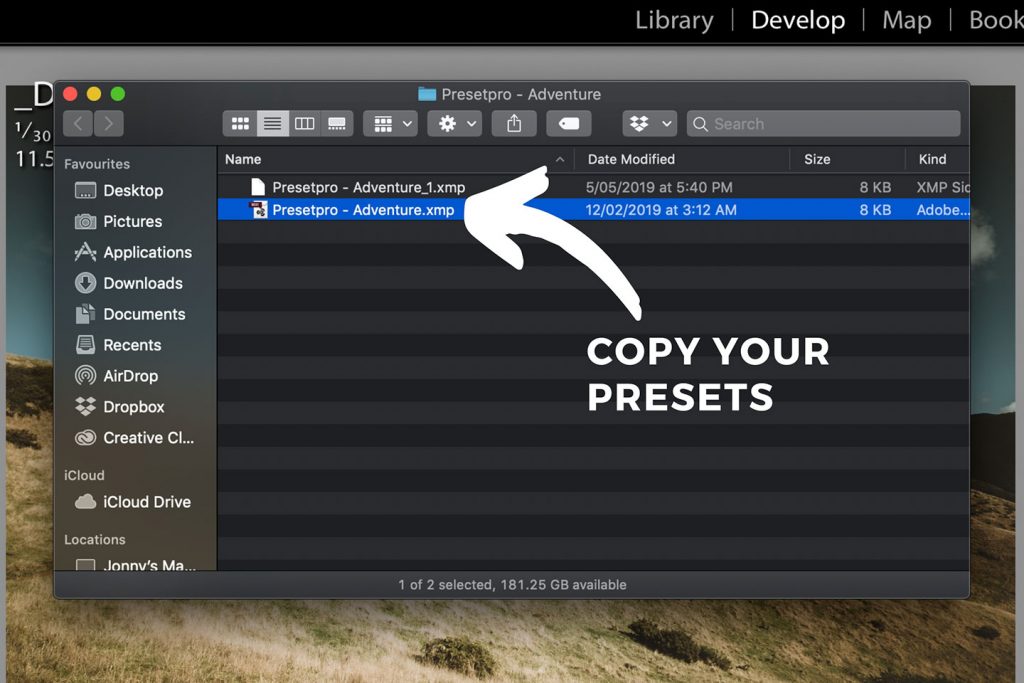
2. Right click of one of them and, on a mac click Show In Finder, on a PC click Show In Explorer.
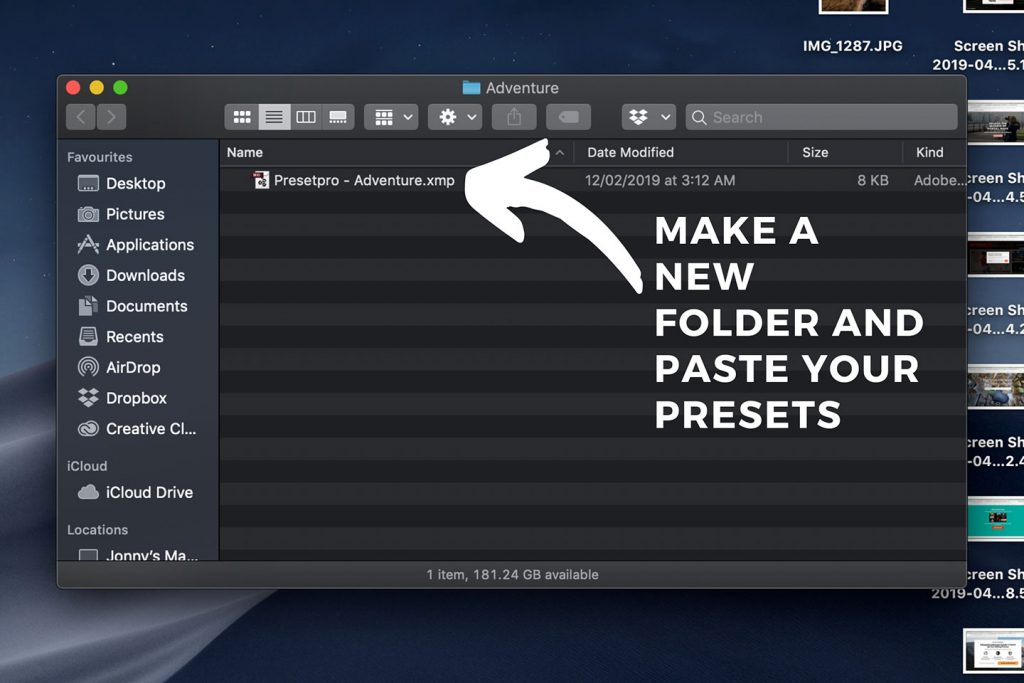
3. This will take you to the folder where the presets are. Create a new folder on your desktop and copy all the preset files that you want on the mobile app to the new desktop folder.
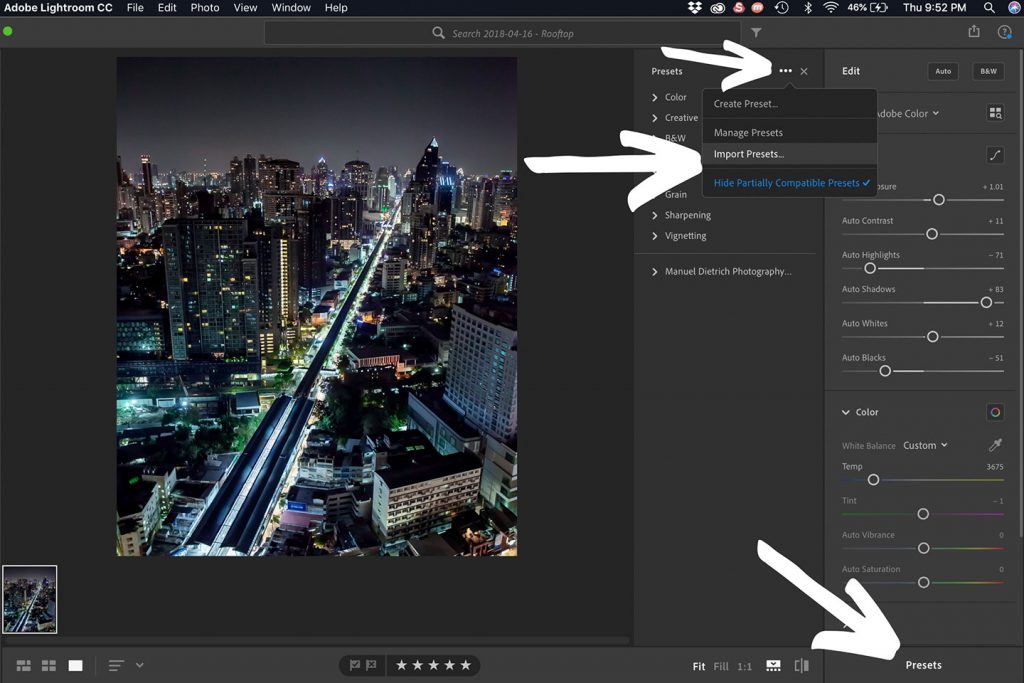
4. Head to the Lightroom CC app on your computer and go to Presets in the bottom right corner. A menu will show on the left with your presets in. Click the 3 dots icon at the top of this menu and then click Import Presets.
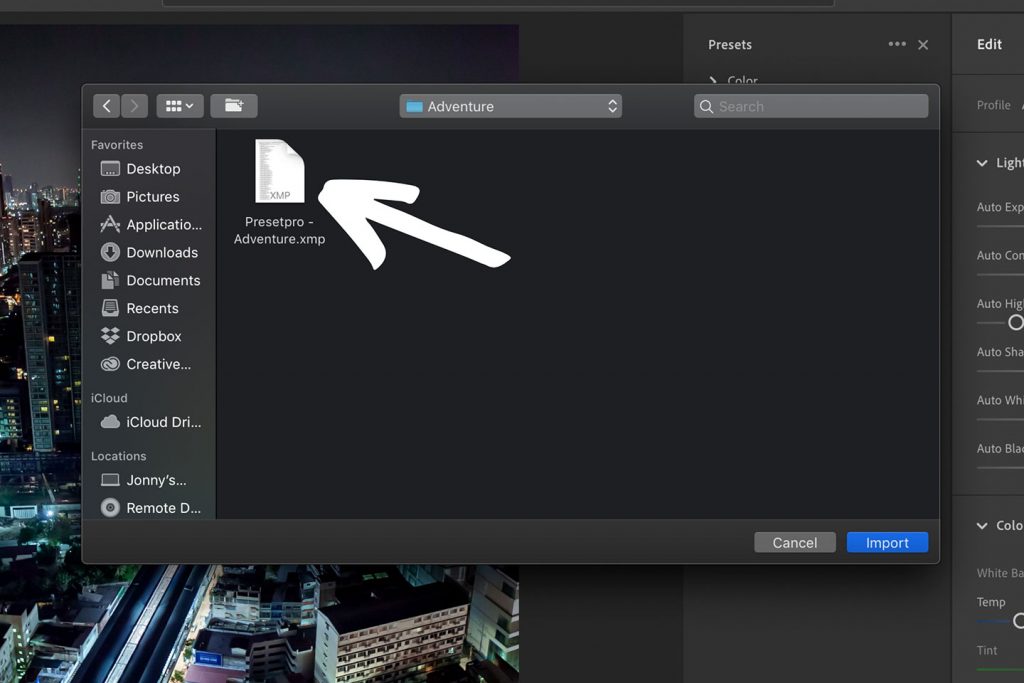
5. Locate the folder you made on your desktop and select Import. This will import all these presets to Lightroom CC.
6. Then, as long as you are logged into the same Creative Cloud account on your mobile device as on your computer, you should see your presets have synced in the mobile app. You can check this by selecting a photo and trying to apply your presets.
Wrapping Up
I hope this has helped you to install presets in Lightroom in whichever version you are using. Whether you are just looking to get your images looking like one of your favourite Instagram influencers or perhaps you’re looking to learn how to improve your skills in Lightroom, Lightroom presets can be an extremely useful tool to integrate into your workflow. However you are using them, just remember that they might not always deliver you perfect photos straight away. Look at them as a way to get great photos quicker and with a few small tweaks of your own you will have awesome photos in no time.
If you want to learn more about Lightroom presets you should check out our Lightroom presets guide which will explain everything.
Pin It!