This article may contain affiliate/compensated links. For full information, please see our disclaimer here.
Lightroom presets are an amazing invention, they essentially allow you to load pre-made adjustments to your photos with nothing more than a click of a button. They can be extremely useful when editing your own photos but they can also be a great way to learn how to actually use Lightroom. In this Lightroom presets guide we are going to be covering absolutely everything you need to know if you want to become a Lightroom presets genius. We will talk about why you might want to use presets, how they work, how to install them, how to adjust them like a boss and most importantly, how to make your own Lightroom presets.
What Are Lightroom Presets?
As I’m sure you are already aware, Lightroom is a program and application that allows you to make edits to enhance your photos on your computer or mobile device. To a newbie Lightroom can be quite a daunting prospect, with all it’s functionality it can be hard knowing where to start when you have little or no knowledge of the program. Luckily for those individuals, Lightroom presets exist. Lightroom presets allow you to apply professional edits and adjustments to your photos even if you have no prior knowledge of Lightroom. These presets work both with the desktop version of Lightroom as well as the free Lightroom mobile application. I will explain in more detail how this all works later on.
Why You Might Want To Use Lightroom Presets?
Now we know exactly what Lightroom presets are, you are probably wondering why you might want to use them. There are a few key reasons why you should be using Lightroom presets, the first is one we have already covered; they allow individuals who have no idea how to edit photos achieve great results. There are lots of free presets offered online nowadays but if you really want to produce amazing outcomes you can purchase professional presets. Many professional photographers and Instagram influencers now sell their presets online, this means that you can achieve similar aesthetics in your own photos.
If you are posting your photos on a platform like Instagram, then Lightroom presets can take your feed from average to spectacular. Presets can help you to achieve a consistent and cohesive feel within your Instagram feed. If you have ever looked at your favourite influencer’s feed and wondered how they achieve such a consistent feel, it’s probably that they use Lightroom presets to edit their photos. If you want to achieve this consistent feel, all you need to do is edit your photos with the same preset or a group of similar Lightroom presets. Check out these great free Lightroom Instagram presets.
Now this might seem a little obvious but presets can save you so much time. Imagine instead of spending 10-20 minutes editing each individual photo, you could edit a whole bunch in a matter of minutes. Professional photographers will generally use their own presets to get to a finished product much sooner. Instead of making the same adjustments on every image, it makes a lot of sense to just apply a preset to save you a lot of time and effort.
The final reason you may want to use Lightroom presets is that they can be an extremely efficient way to actually learn how to use Lightroom itself. When you receive a new preset whether it be from a photographer or influencer, you are not just getting a quick fix to image editing, you are getting a glimpse into how they use Lightroom. Each preset applies the adjustments in Lightroom so you can actually see all the controls they adjusted. With this information you can actually learn how to use Lightrooms adjustment options.
How Do Lightroom Presets Work?
Presets don’t usually come with a Lightroom presets guide so you might be wondering how they actually work. The process of a Lightroom preset is actually very simple, first of all adjustments are made to an image using Lightroom. You can then save these adjustments as a preset in Lightroom to easily edit your future photos. The preset is saved as a .XMP file in the desktop version of Lightroom or a .DNG file if using the mobile version of Lightroom.
Now the adjustments you made have been saved as a preset you are free to use this to edit any photos you have. Simply click the preset you have created and all the adjustments you saved will be applied to your new image. You can then make little adjustments so that the preset suits the image you are editing. Photos are not always shot the same, so some presets may not work on every photo you take and this is why it is good to have a selection of different presets that work across a variety of images.
Lightroom Presets Guide
Now onto the part you have all been waiting for, the ultimate Lightroom presets guide. We are going to teach you everything you need to know so that you can become a presets professional.
How to Easily Install Lightroom Presets
If you have purchased some presets or even downloaded some free presets, you will first need to install the presets in order to use them. The process of installing in the desktop program and mobile application is entirely different so I will explain them both individually.
How to Install Using Adobe Lightroom Classic CC
1. Download the new presets to your computer, make sure the files you are downloading are .XMP files.
2. Open Lightroom CC.
3. If you are using a Mac, click the Lightroom tab in the top left corner and then Preferences. If you are using Windows, you want to click Edit and then Preferences.
4. You will then see a pop up menu appear, click the presets tab at the top of this menu.
5. Under Location you want to make sure ‘Store Presets With This Catalog’ is unchecked. This will allow you to use the presets in all the catalogs you open.
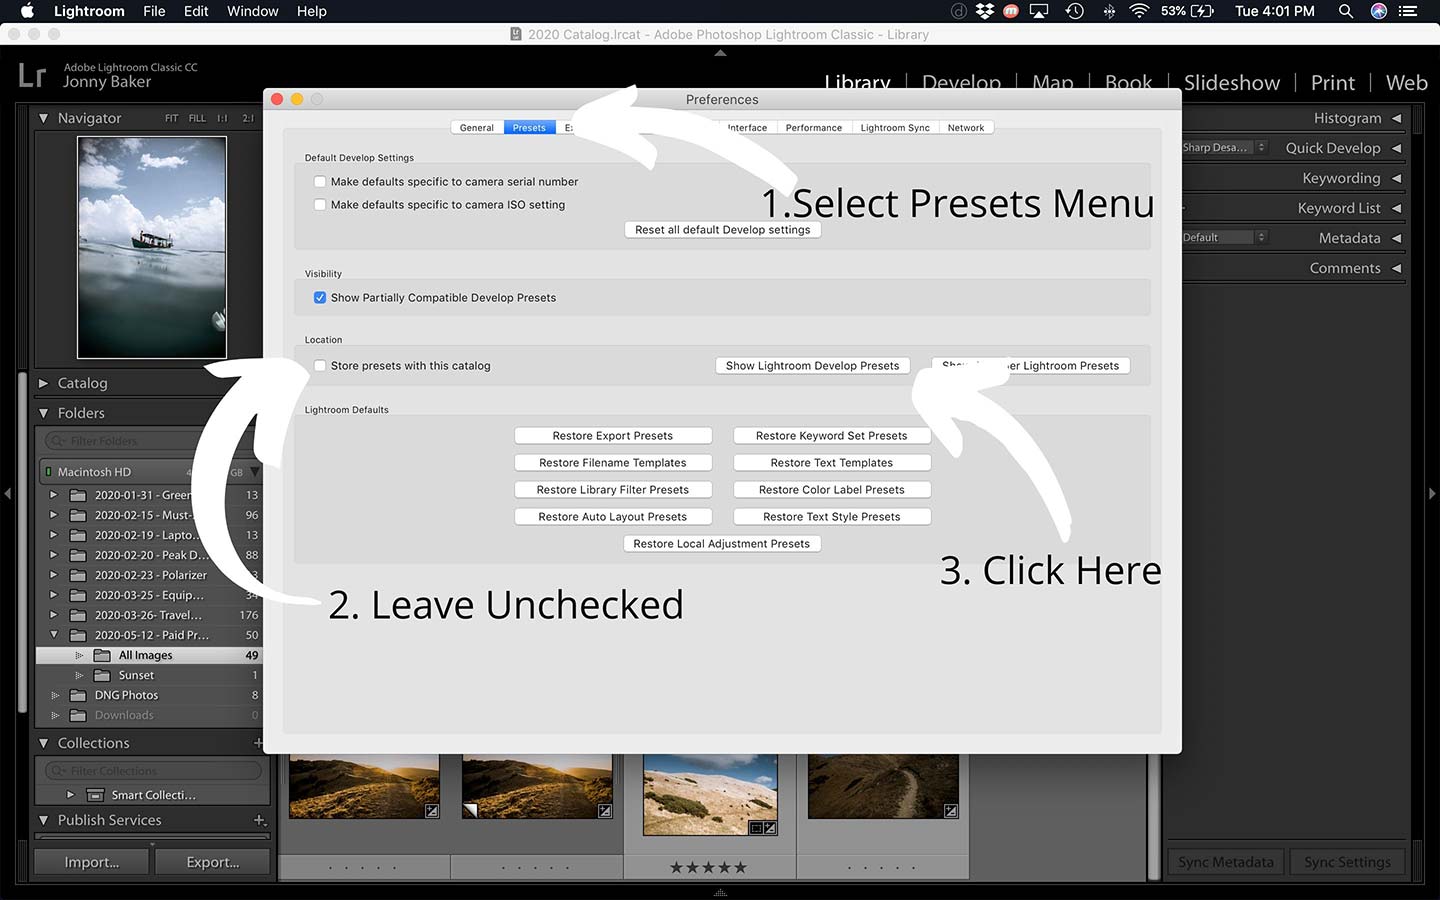
6. Next you want to click on ‘Show Lightroom Develop Presets’. This will show the folder you need to copy your new preset .XMP files to.
7. Double click the highlighted ‘Settings’ folder. Then copy and paste the .XMP preset files to this location.
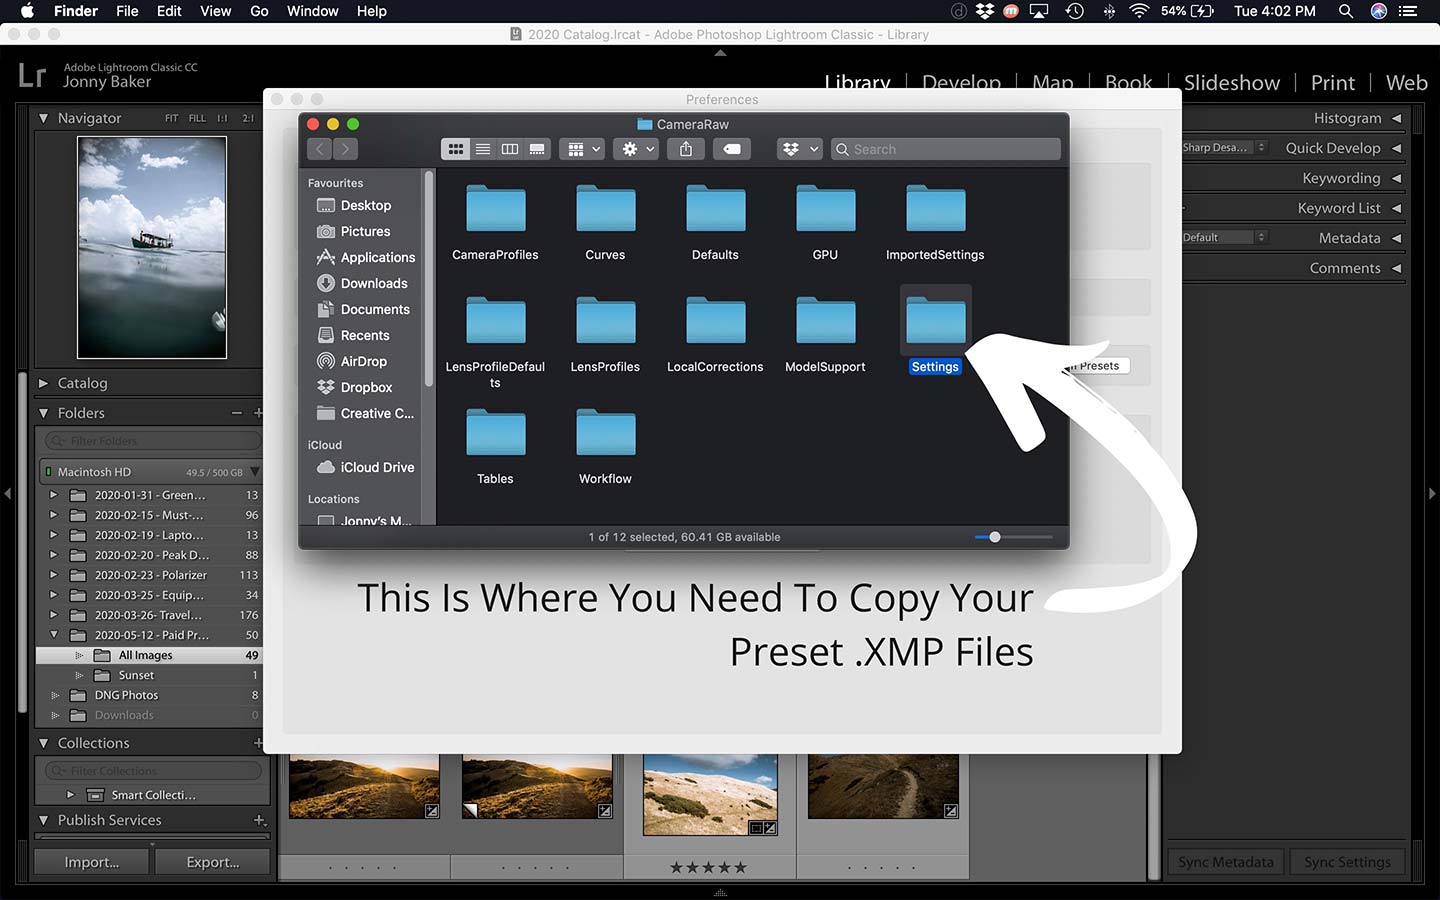
8. Completely restart Lightroom. This will allow the new preset files to load when you open Lightroom again. The presets are now installed.
How to Install Using Adobe Lightroom Mobile
1. Download the new presets to your mobile device, make sure the files you are downloading are .DNG files.
2. Open the Lightroom application on your device.
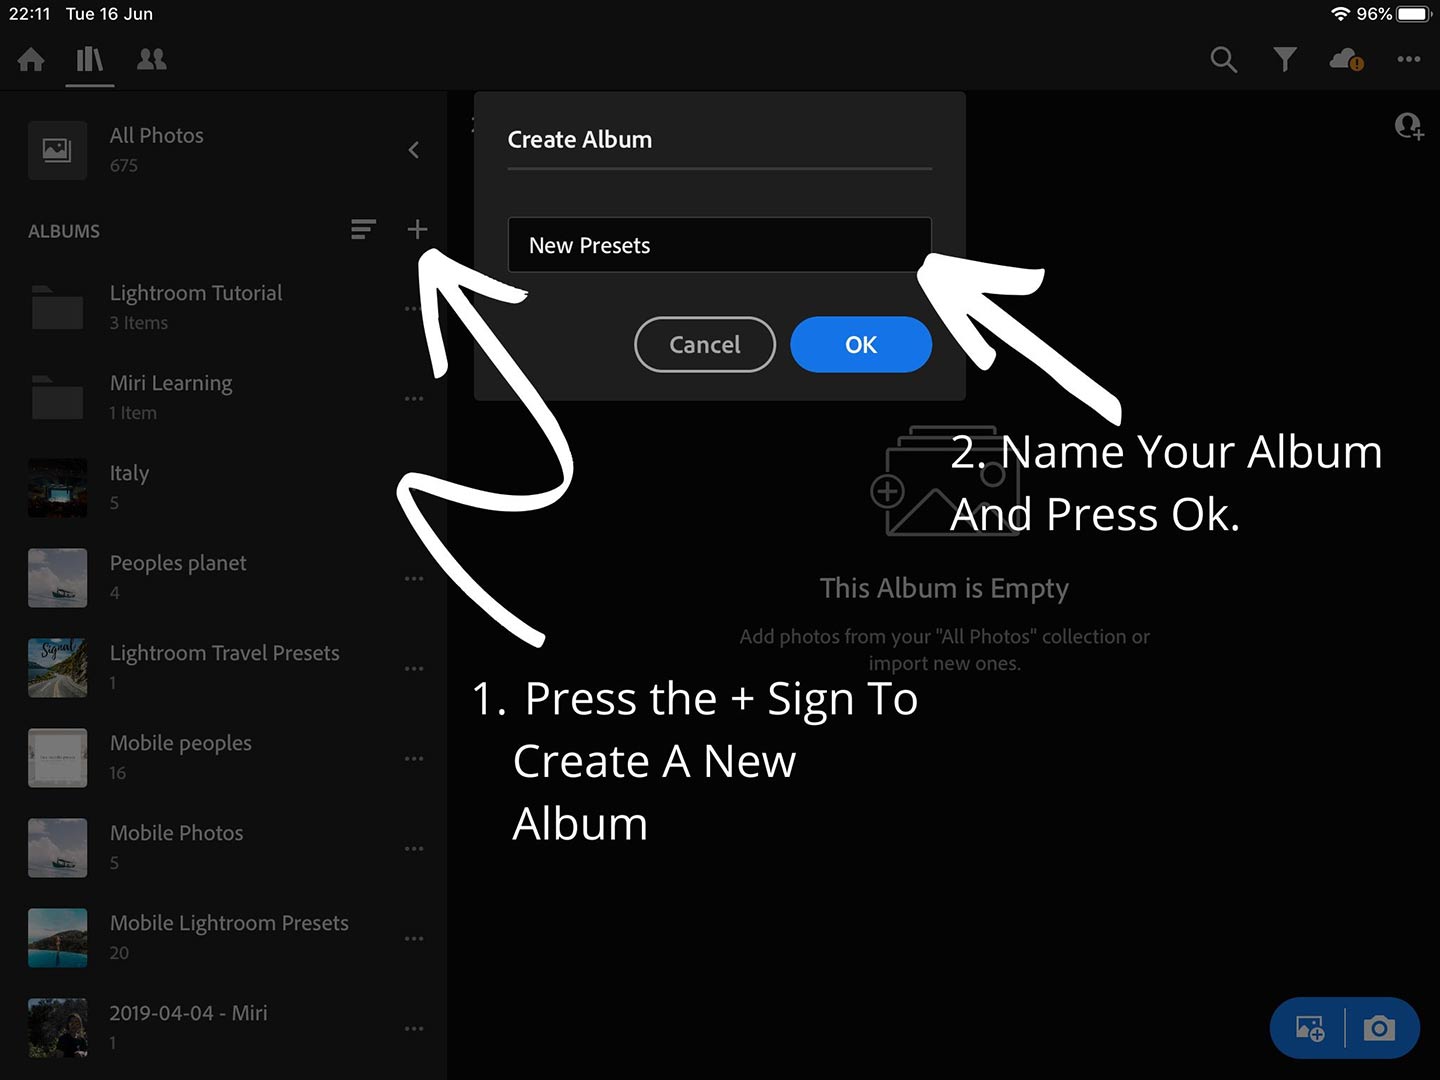
3. We now need to import the .DNG files to Lightroom. To do this, create a new album by pressing the + sign next to albums, then select album, name the album and open it.
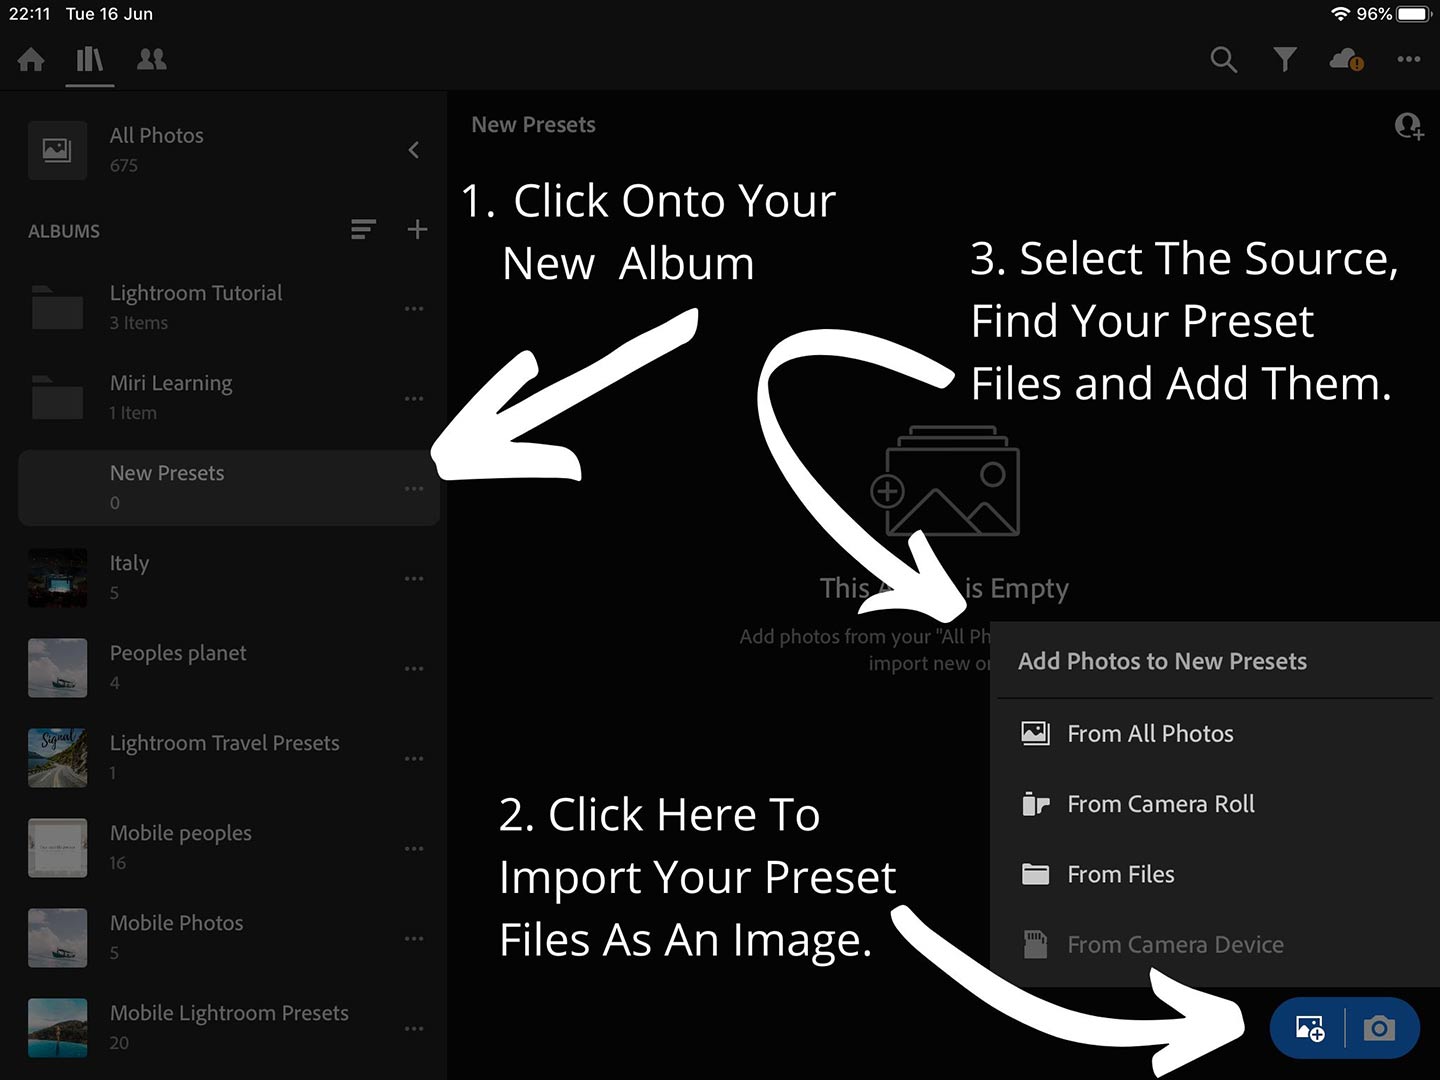
4. Press the icon with a picture frame and the plus to add photos. Find the .DNG file that you downloaded. Select the file and click ‘Add Photos’.
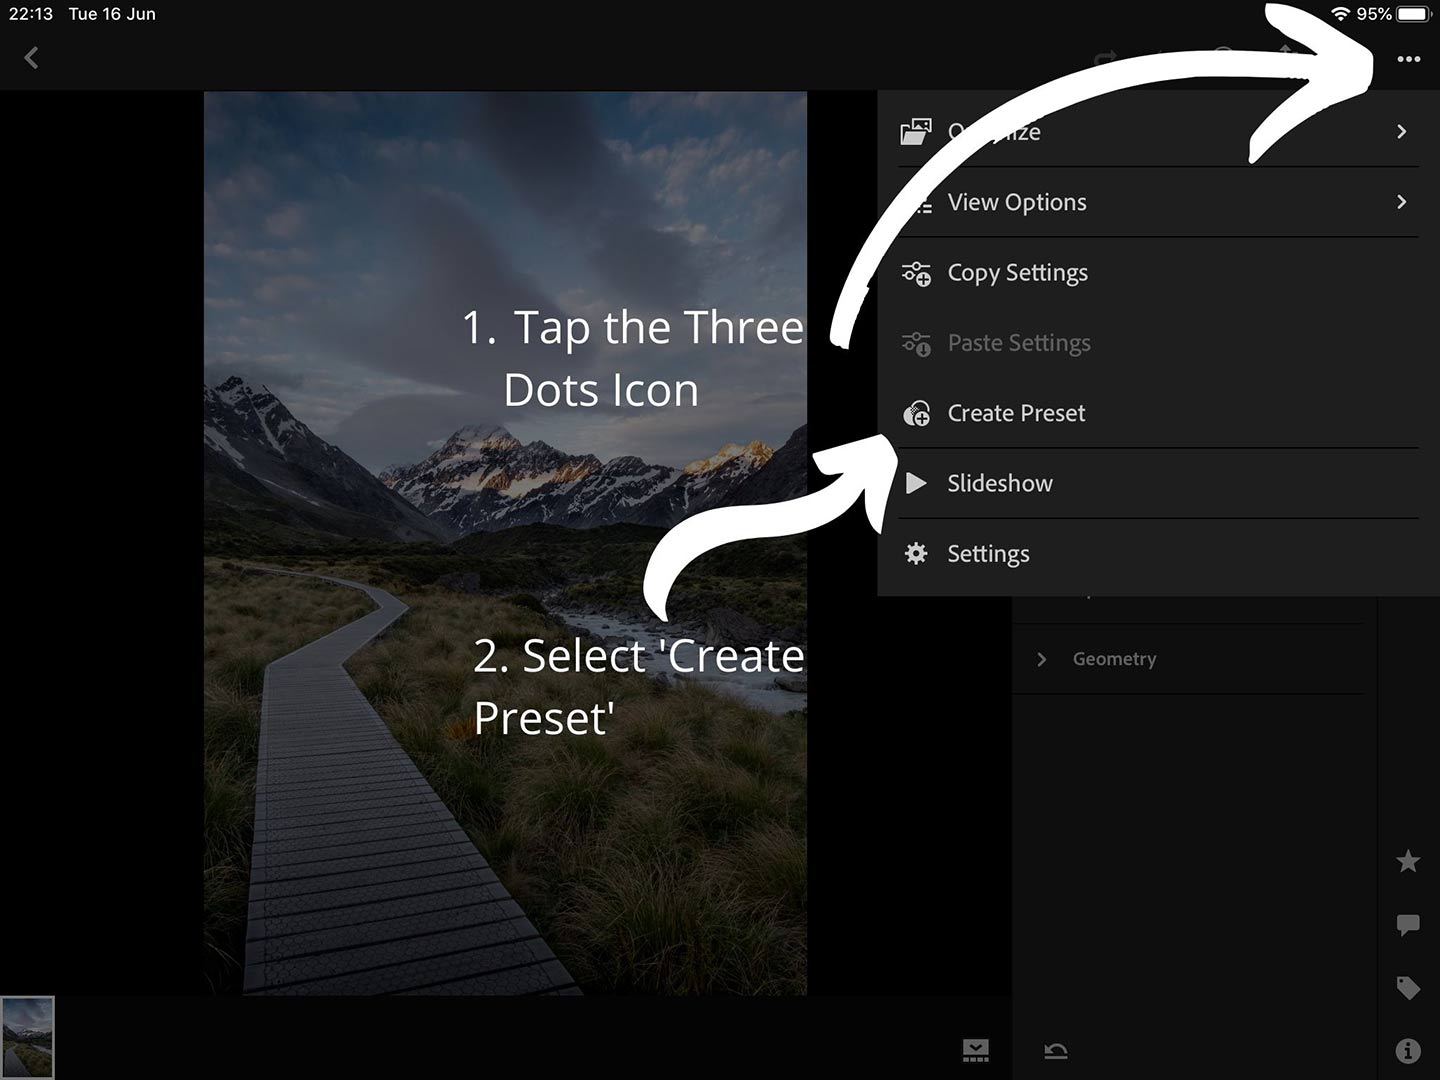
5. You should now have the preset file in your album. Open the preset by clicking on it. Now tap the three dots icon in the top right corner and select ‘Create Preset’.
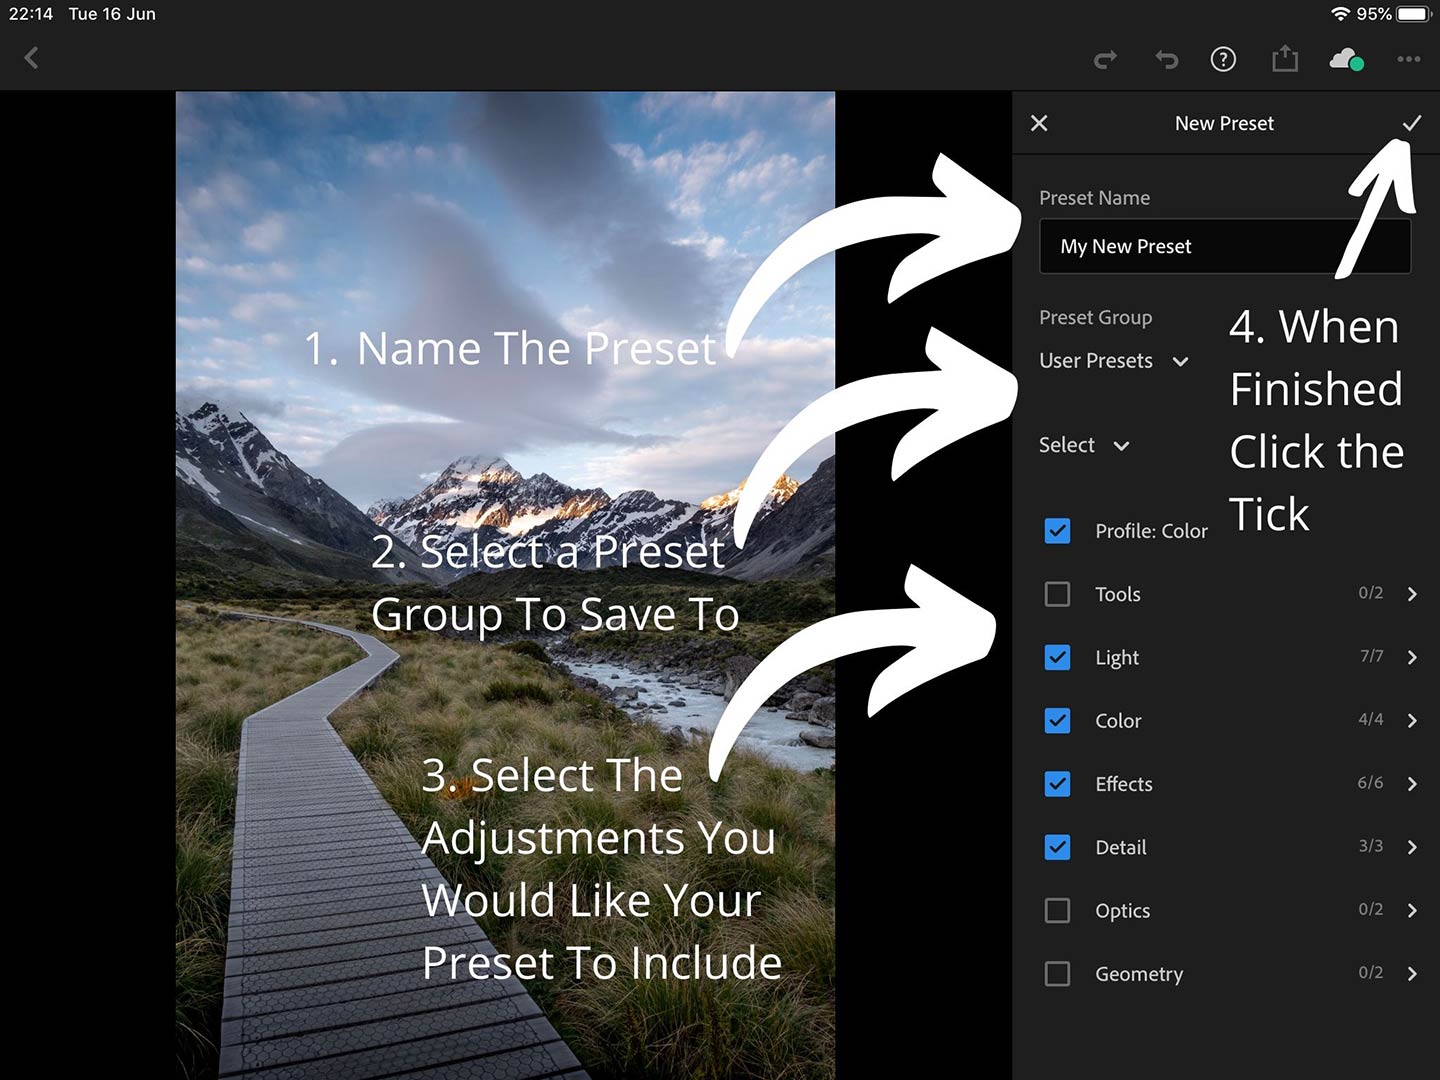
6. Enter the name of the preset and select a group to save it to. You should also select all the checkboxes except for, Tools, Optics and Geometry. When finished press the tick in the top right corner.
7. The preset is now ready to use on any photo you want to edit. You can repeat these steps for any other presets you would like installed in the mobile application.
How to Use Presets?
Now that we have our presets installed, the next part of this Lightroom presets guide explores how to actually use the presets.
Presets are designed to be extremely easy to use, it really is as easy as clicking a button. Again the process of using desktop presets and mobile presets is slightly different so I will explain them separately.
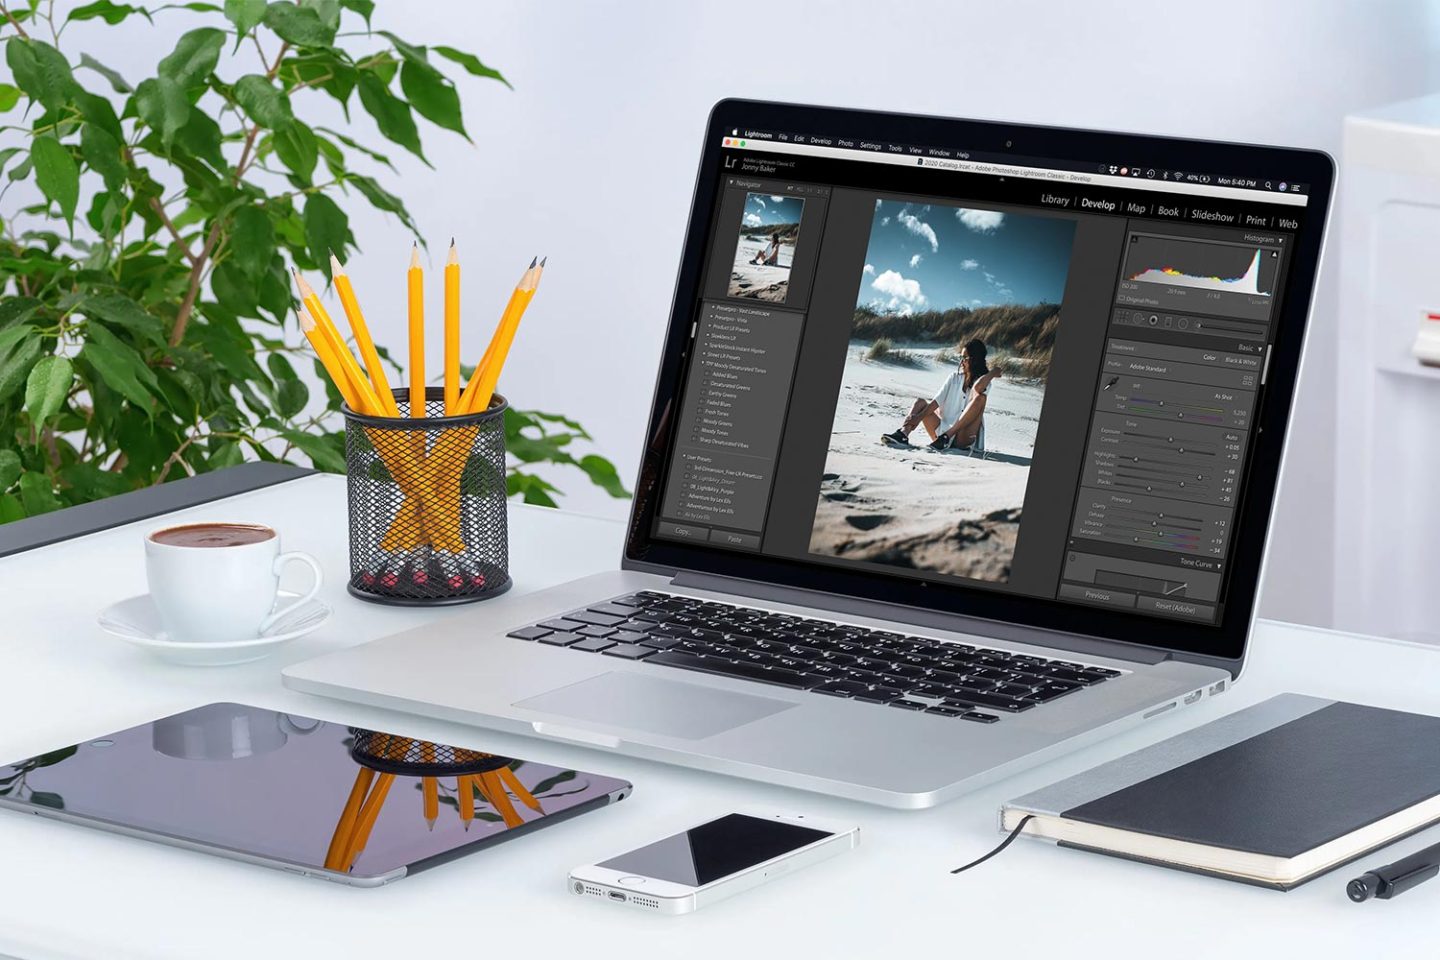
If you are using the desktop program click on a photo that you have imported to Lightroom, you then need to enter the ‘Develop’ module. You can do this by clicking ‘Develop’ in the module picker at the top or simply by clicking ‘d’ on your keyboard. Next find the Presets drop down menu which should be located on the left of your screen. You should be able to see the presets you installed here. To apply the preset to your image simply click on the preset, the adjustments will then apply to your image.

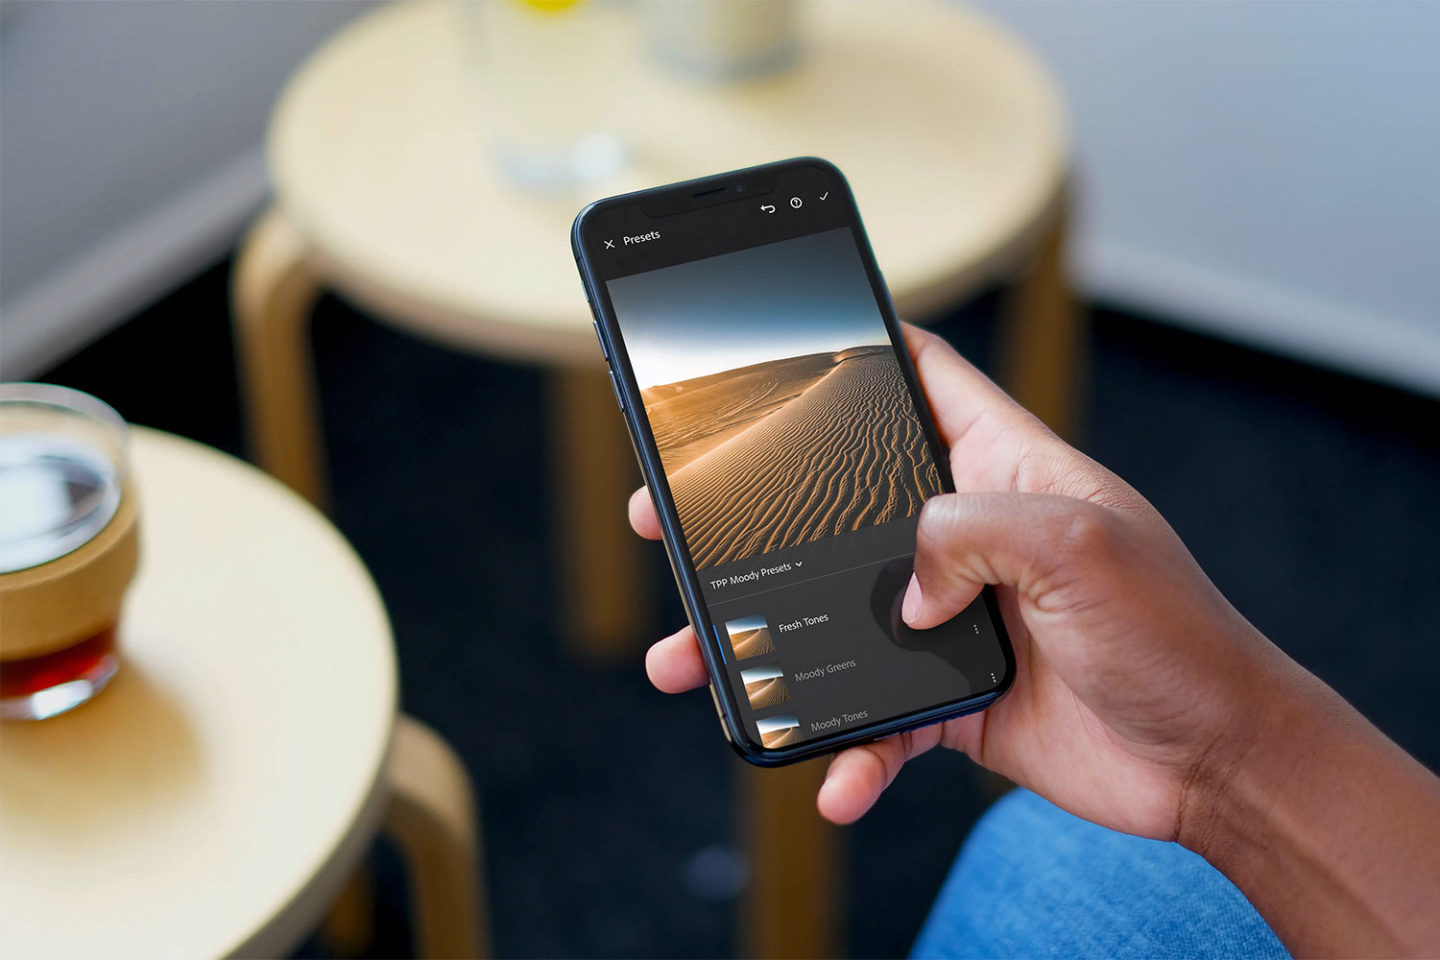
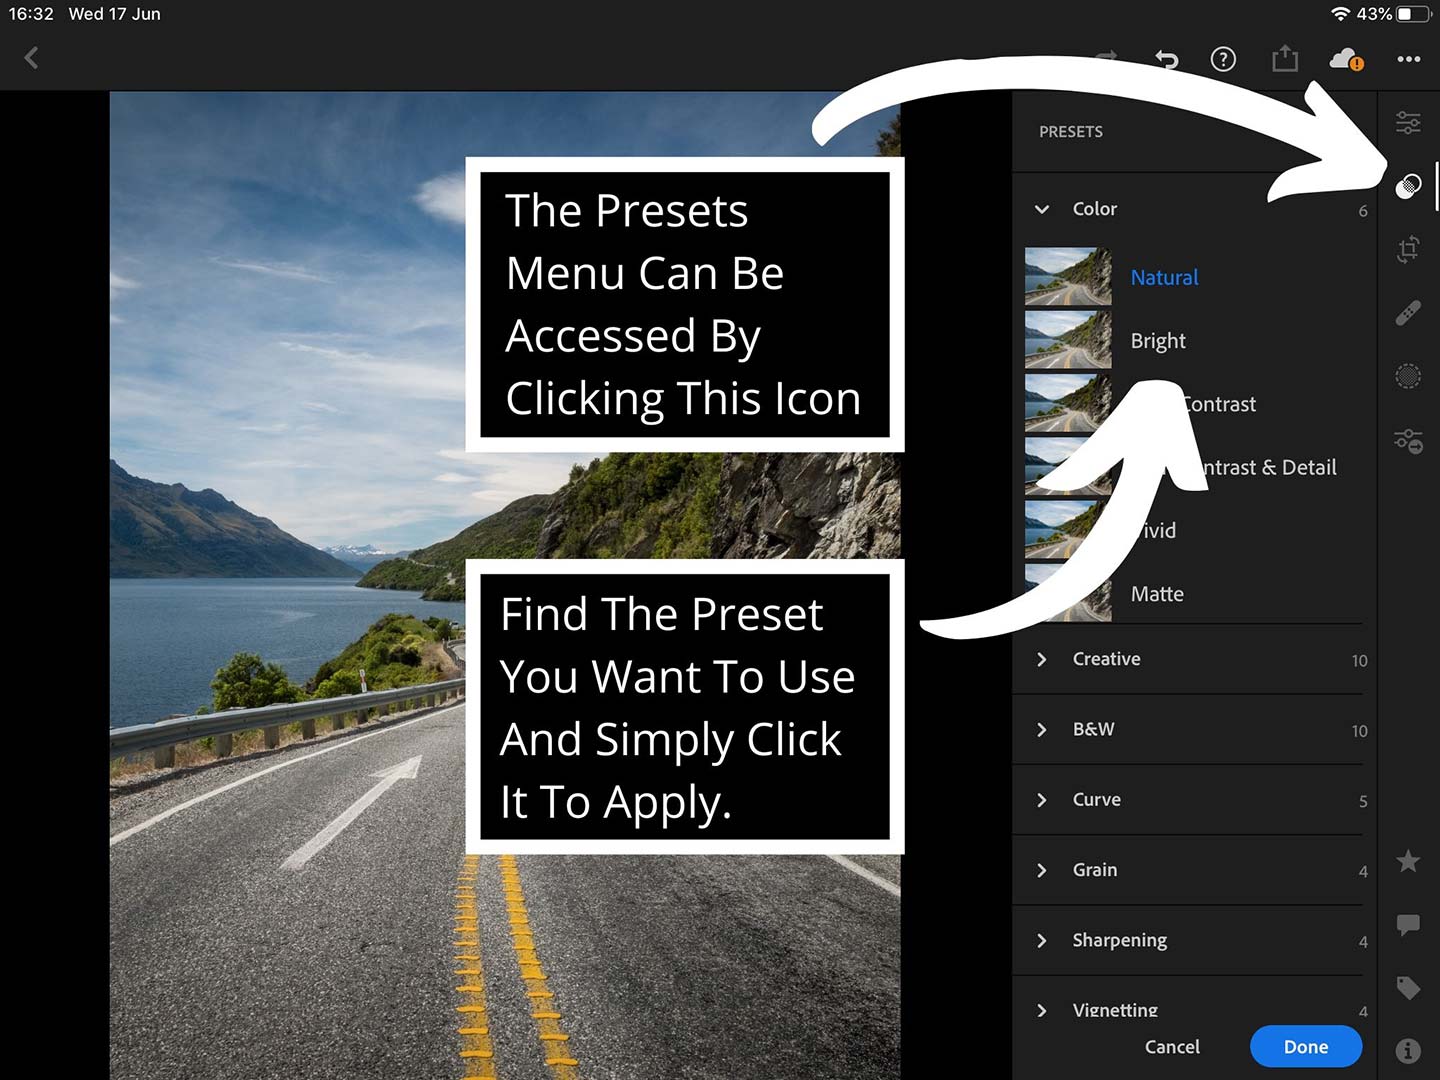
If you are using the mobile Lightroom application, the process of applying a preset is slightly different. Open the Lightroom app on your mobile device and select a photo that you would like to apply a preset to, this will open the develop module. You then need to find the icon with two overlapping circles. If you are using Lightroom on a phone this will be located on a bar at the bottom of your screen (you may need to scroll to the left to find the icon). If you are using a tablet this will be located on the right hand side of the screen. When you click on the icon the presets menu will show, simply find the preset you want to use, click it and it will apply the adjustments to your image.
How to Adjust Presets Like a Boss
Presets are obviously great but unfortunately, they are not always one size fits all. Some presets will work really well with some photos and not so well with others and this is why it is a good idea to have an array to choose from. However, when a preset doesn’t work so well, all it may actually need is one or two little adjustments. In this section of the Lightroom presets guide we are going to learn exactly how to make some basic adjustments and make improvements to presets.
1. Images Look to Dark or Too Bright
One of the simplest problems you might come across are photos that are either too bright or too dark. This can occur because either your images were badly exposed when taken or perhaps the preset you applied to your photo overly affects the brightness. Either way this is a very simple fix.
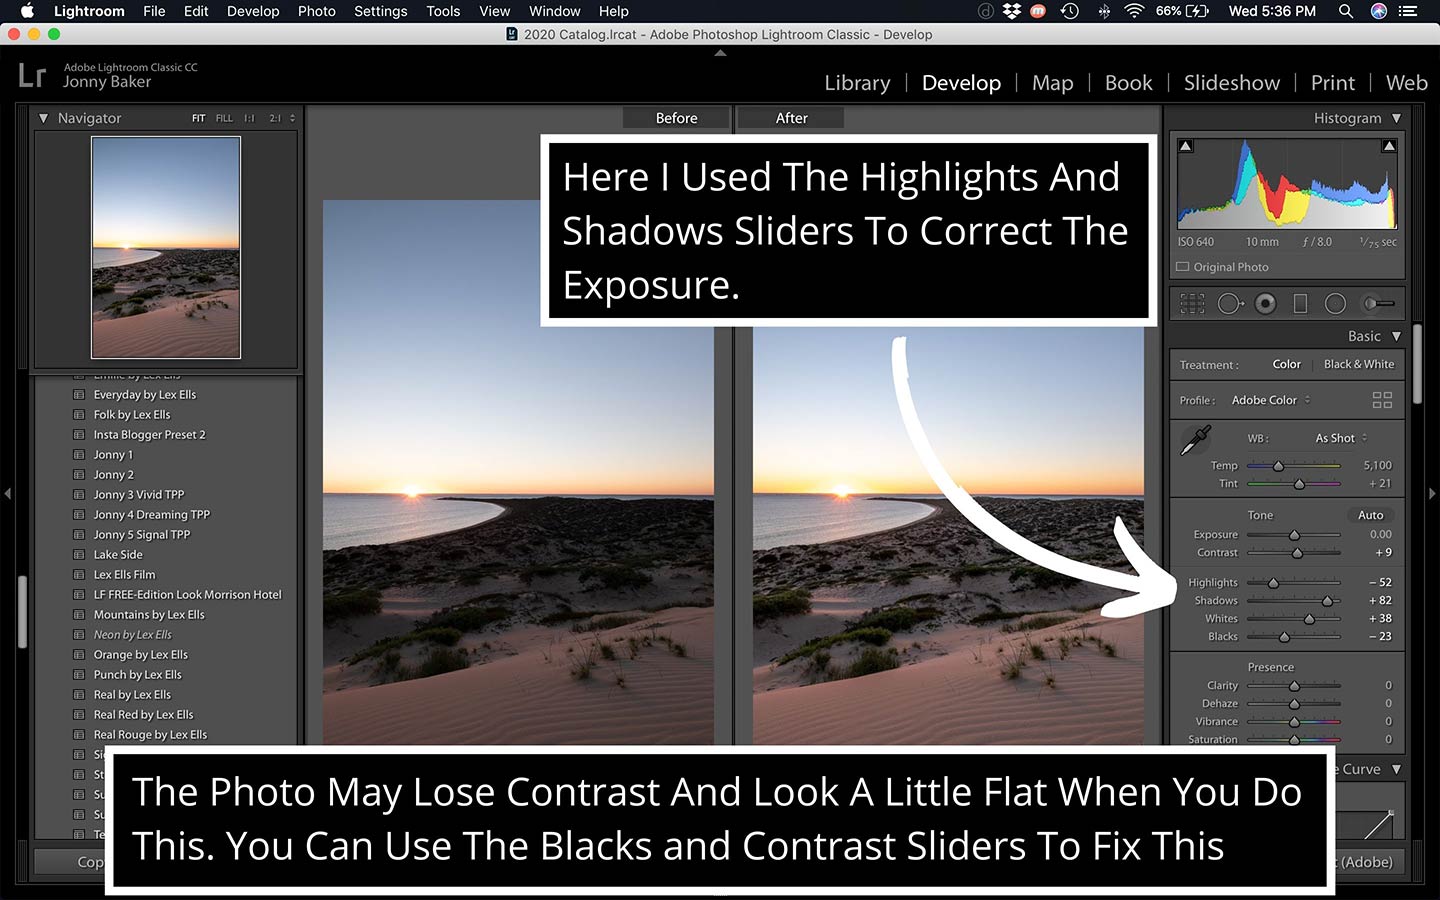
If the image is too dark you can use the exposure slider and move it towards the right until you achieve the desired outcome, if your photo is too bright you can move the slider to the left. This isn’t always actually the best way to go about things as it affects the exposure of the entire image. If this doesn’t work, try using the ‘highlights’ and ‘shadows’ sliders, these will only affect the exposure of either the highlights or shadows in your image. This is helpful when editing an image where the highlights and shadows need to be individually adjusted. This is normally the case for any sort of photography that takes place outside, eg. landscape photography.
2. The Photos Are Too Saturated
Another common issue that a lot of free presets in particular seem to have, is that they introduce too much saturation into photos. Now this is a very easy fix, simply scroll down the menu until you find the ‘Saturation’ and ‘Vibrance’ sliders. You can drag either of these sliders to the left and they will both desaturate the colours in the image. However, this can make your photo look a little dull. Instead, try to bring the saturation down by gradually moving the saturation slider to the left and the vibrance slider to the right until you find a nice balance. This is a great technique I love to use in my own photos, it’s a great way to take some of the saturation out of your photos.
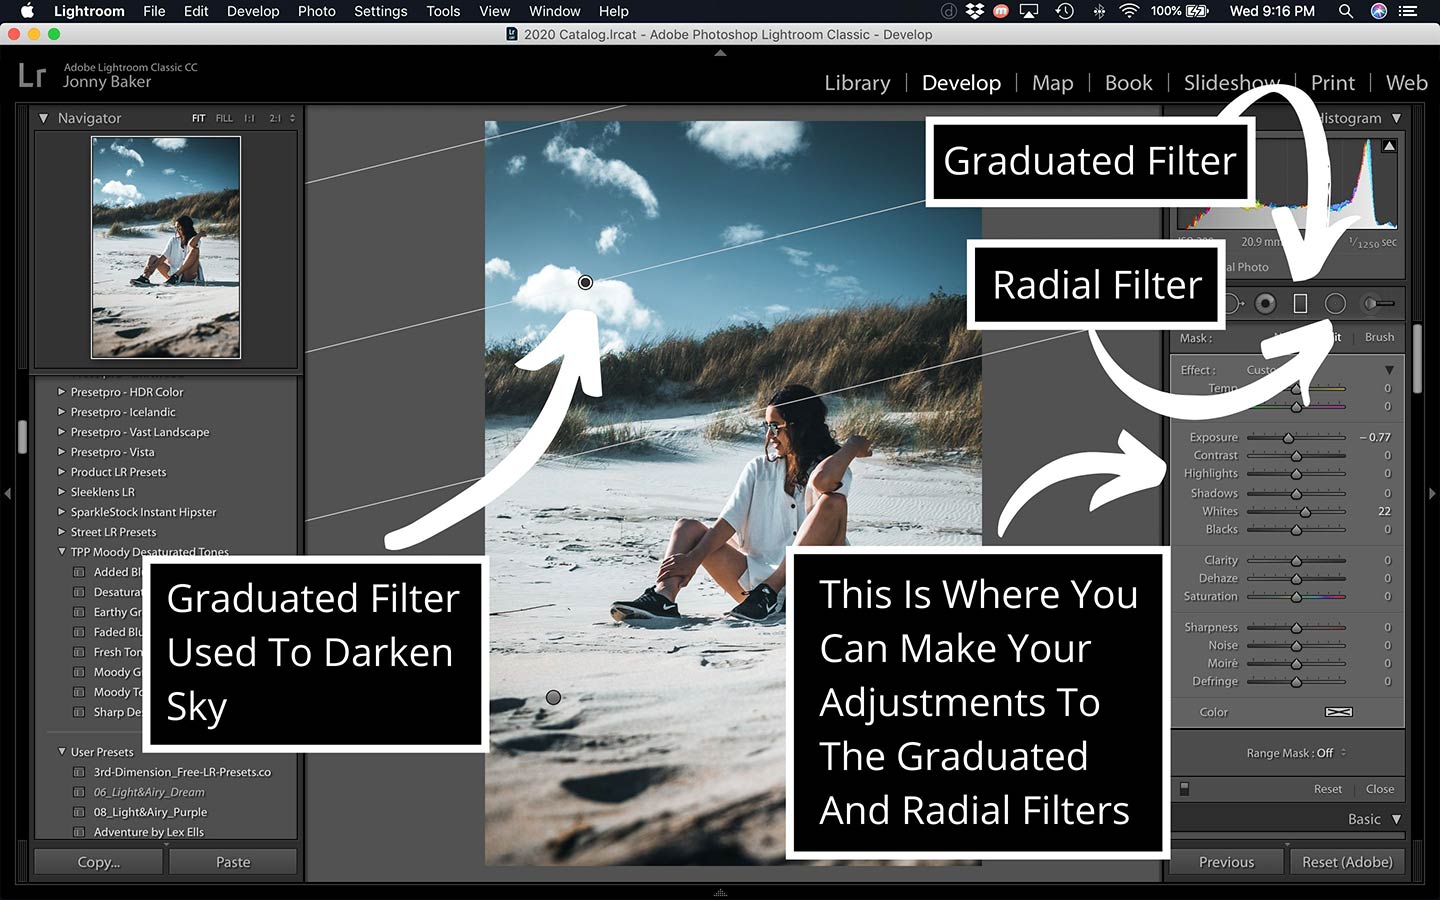
3. Use the Graduated and Radial Filters
Lightroom has a very powerful feature which will allow you to make adjustments to specific parts of your photos, by using the graduated and radial filters. Most presets will not make use of this feature and this is because most images tend to be unique, which means this sort of adjustment has to be tailored to each individual image. Although most presets don’t take advantage of this feature, you can definitely add some filters on after applying the preset to make some of your own improvements.
In the desktop version of Lightroom you can find these filters on the toolbar located underneath the histogram. In Lightroom mobile this feature is called ‘Selective Edits’ you can find this feature on the bottom or side toolbars, its icon is the circle with ‘Selective’ underneath it. I like to add the graduated filter to the sky and foreground in landscape and travel images to add contrast and subtly darken these areas. I find the radial filter works great if you have a main subject that you would like to add more focus to. Simply add the filter over the main subject and use the shadows and highlights sliders to gradually brighten this area. If you want to learn more about this feature in Lightroom, check out this great resource.
How to Make Your Own Presets
In this section of the Lightroom presets guide we will be discussing how you can make your very own presets to help speed up your editing workflow. If you have a certain style when it comes to editing, then you probably edit each individual photo in the same way more or less, so creating presets is a no brainer. Although creating presets is something that a more seasoned Lightroom user may be interested in, it certainly could benefit beginners too. For instance, if you use a preset and regularly find yourself adjusting it to fit your photos, it may be useful to create a new preset to use. If you are a Lightroom beginner check out this great video that will teach you exactly how to start editing yourself.
The process of creating presets is very simple, but again it differs between the desktop program and mobile application.
If you are using the desktop program there are a couple of ways of creating your presets. After finishing your edit stay in the develop module and in the presets bar to the left, click the ‘+’ sign and then ‘Create Preset’. You can also use the top toolbar, simply click ‘Develop’ and ‘New Preset’. This will bring up a new dialog box, name your preset and choose a group to save it to, you can create a new group if needed. You then need to select all the settings that you want applied, in most cases you should check all except the transform settings. Once you are finished click ‘Create’. Your preset is now ready for you to use in the presets panel on the left.

If you are using the mobile application, the process of creating your presets is again very straightforward. Once you have finished applying the adjustments to your image press the three dots icon in the top right corner, then click ‘Create Preset’. Give the new preset a name, select a group to save it to or create a new preset group. You then need to select the adjustments that you want to include in your preset. Most people will find that they need to tick all boxes except ‘Tools’ and ‘Geometry’ but if you do want these included in your presets, check these boxes. Then simply press the tick in the top right corner and your preset is ready for you to use.
Lightroom Killer Tips
Finally, in this Lightroom presets guide I will be sharing some awesome killer tips that will help to improve your experience with the program. The majority of these tips will help those that use the desktop application.
1. Solo Mode
If you’re a beginner Lightroom user, Solo Mode is something that will help improve your experience whilst using the desktop program. If you’ve never used Lightroom before it can be a little confusing at first but don’t worry, Solo Mode can help. If you head over to the adjustments panel on the right of Lightroom whilst in the develop module you will notice all the panels are open as default. This can seem a little complex to some users but the solution is Solo Mode. Essentially, this allows only one panel to be open at once. To enter Solo Mode right click on one of the develop panel titles and click ‘Solo Mode’.
2. Quickly Reset Entire Adjustments Panels
If you want to quickly reset all the adjustments in one of the panels of Lightroom, simply press alt/option and the title of each section will change to reset. Simply click where it says reset and the entire panel will change back to its original settings. For instance, if you wanted to reset the adjustments under ‘Tone’ press alt/option the title will change to ‘Reset Tone’, simply click it and it will reset. You can also reset by double clicking the title. If you want to reset all adjustments applied, there is a ‘Reset’ button in the bottom right corner.
3. Turn Off Lights In Lightroom
This feature will help you to view your images without the distraction of everything in Lightroom. Simply press L and everything around your image in Lightroom will dim by 80%, press L again and Lightroom will darken by 100%. You can also press Shift+L to go the opposite way 100% black first, then again to go to 80% dimness. This is great for viewing your images without the distraction of all the panels in Lightroom.

4. Change the Background
Did you know that you can also change the background colour of the area around your image? The default background color is dark grey but you can change the color to black, white or four different shades of grey. This can come in useful when editing lots of different types of imagery. For instance, if you are editing images of snow, a white background may be useful whereas an astrophotography image may benefit from having a black background surrounding it. To change the background, simply right click on the area around the image and choose which color you would like displayed.
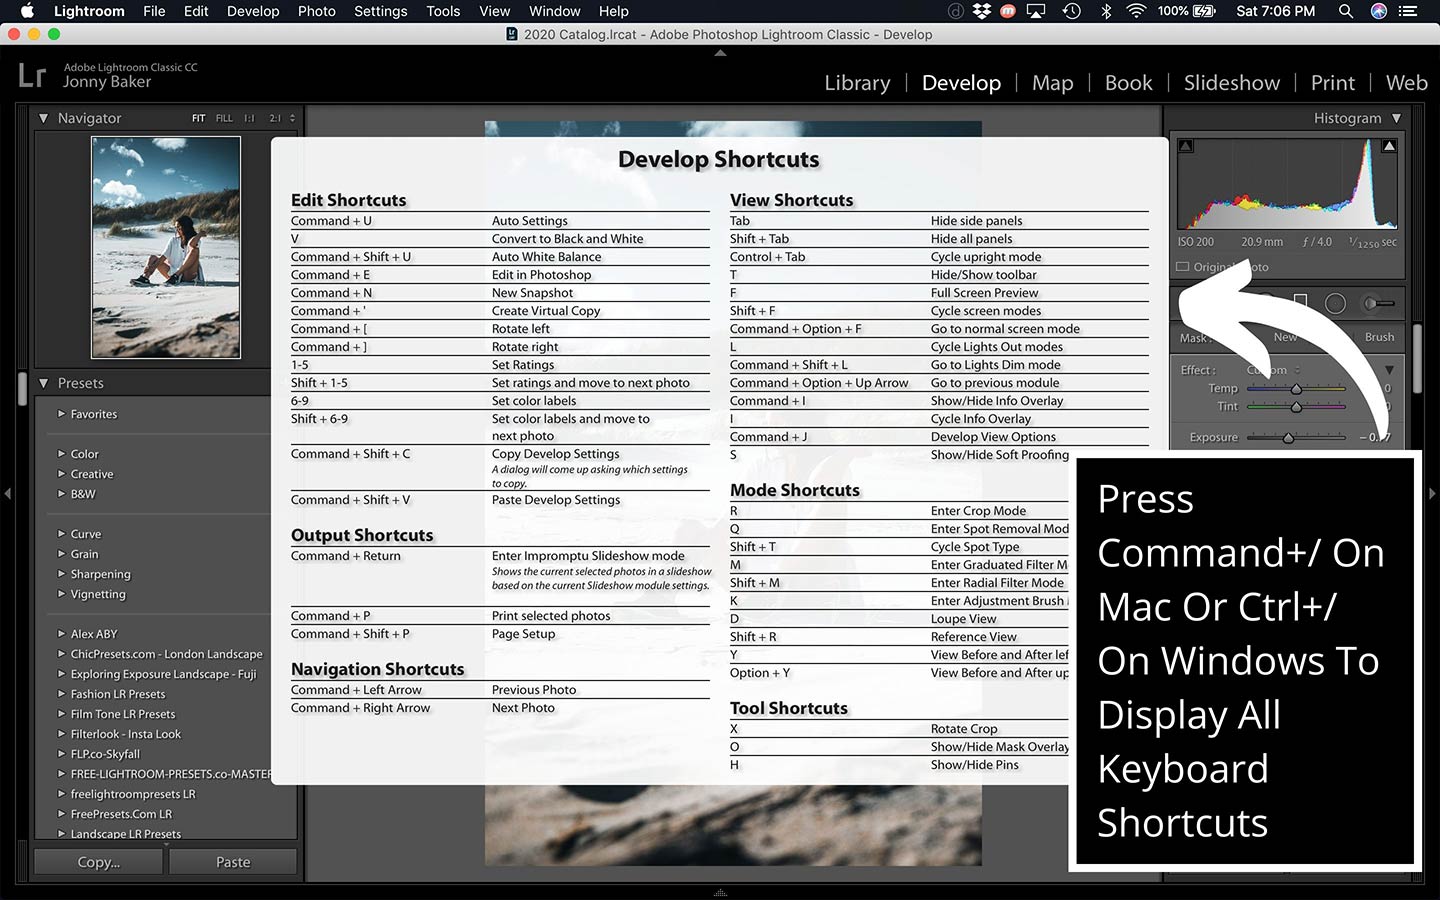
5. Display All Keyboard Shortcuts
Now the last tip of this Lightroom presets guide may prove invaluable to those that love keyboard shortcuts. There is a simple shortcut to display all the keyboard shortcuts for the current module you are using in Lightroom, simply press Command+/ if using a mac and Ctrl+/ if using a Windows computer. A window will pop up showing you all the shortcuts for the specific module you are using. For instance, if you are in the Library module you will see shortcuts specific to this module, if you are in the Develop module you will see shortcuts specific for the Develop module.
I hope you enjoyed this Lightroom presets guide, if all went to plan you should hopefully now have all the knowledge to become a master of Lightroom presets. If, however you do still have any unanswered questions please leave a comment and I’ll do my best to answer them.
If you’re looking for some more Lightroom related content check out these great articles.
- 8 Powerful Lightroom Mobile Presets You Need Right Now
- 15 Amazing Free Lightroom Landscape Presets You Need Now
Disclaimer: The Photographers Passport is a participant in the Amazon Services LLC Associates Program, an affiliate advertising program designed to provide a means for us to earn fees by linking to Amazon and affiliated sites at no additional cost to you. Please note we only link to products & services we personally use or trust.
Pin It!
